
Birthday Memories
by Rachel Carlson
The goodies for the challenge could not have been more perfect timing. I will celebrate my ‘2ND” annual 40th birthday this Saturday. I wanted a way to collect my friend’s thoughts, advice, etc in a special place. The tin would be a great way to capture the day at breakfast and a vintage market for the day.
The Barcelona paper is delish – I love polka dots –
I knew what the outside of my tin would look like right away!
 Cut paper to fit tin. In this case I simply cut a 12x12
sheet of paper sized perfectly for the tin.
Use the full length so that you can
add a ‘fold’ around the backside for a clean edge.
 I used Super Tape by Therm O Web to ensure a secure hold.
Super Tape is not red; it’s the protective covering for a double-sided tape.
Do not forget to add extra for the flap in back.

 Because I love the strips of words on the 97% Complete Sticker-G is for Gypsy,
I thought I would add it to the top of the lid for a complete look of sorts.
The words will also describe the kind of day we will
have at market on Saturday. These stickers give any ‘edge’ a great look!
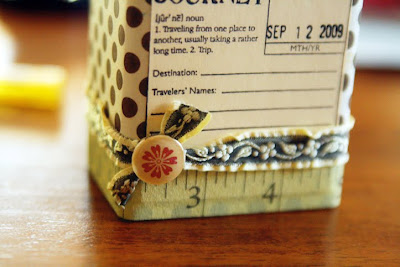
 Now it was time to use the new Paper Tape by 7 Gypsies! This stuff is great. Tears easily, can also be used like the strips of words, etc. My favorite is the Victoria patterned paper tape. You get three different rolls in the package (5yds each); navy with creme polka dots, pink and creme stripes, and one the looks like a measuring tape (that's my favorite). I have been sewing a lot these days so I felt that the measuring tape was a great way to highlight this new love in my life right now.
TIP: For this project, I found that pulling the paper tape off a little at a time as you go around the tin works best. Allow for extra on the end so you can overlap the two OR simply tear at the end for some messy, eclectic flair – like life in my 40’s has been – ha!
 I decided to punch a hole in the tin so that I could add a brad. The tin is smooth enough for a Crop-A-Dile to punch a hole right through. It worked best on the side because that was the only way I could fit the Crop-A-Dile to go ‘in’ the tin to punch. If you find another way, please let me know! Of course, you could easily ‘drill’ a hole in the front if you really wanted a brad on the front cover of the tin as I did for the top of the lid.


I stamped the 97% Complete Journal Stamps – Travel on a blank ATC card for the front of the tin. I felt this would be the best way to describe the day. AHEM, my ‘2nd’ ‘annual’ 40th is a big deal after all…in my mind at least. GULP.
 I added the backside of the Barcelona paper –Sabadell (the stripes), on the lid... a great contrast to the polka dots. I love double-sided paper!
 I then added some Hudson Valley Ribbon around the bottom edge and accented with another brad. I snipped the legs off the brad so that it could lay flat on the ribbon.
 Now it was time to play with the ATC tabs and the 6x6 Victoria pad which is also double sided. I feel that paper at this size works best on smaller items, hence the black ATC tabs. Make sure you apply paper to both sides of the tabs so that the notches on the tabs are covered up – you don’t want the notches to get in the way when stored in the tin. These notched tabs are also used for the ATC Revolving Holder. Don’t be afraid to improvise and use them for other things!
 I also added paper clips to each tabbed ATC card. It’s best to put the clip on paper first and then add adhesive. This will lock in the paper clip so that it will not come off when taking in/out of tin, etc.
 Again, CHEERS for double-sided paper at this size – allowing you to take the guesswork out of what to use on each side. You’ll notice that I also added strips of words from the Gypsy 97% Complete Stickers for the edges to cover up paper cut too short, etc. See, yet another way those strips of words come in handy.

The idea is as follows: I will place a photo (taken at party) of each guest to the non-patterned (save for a few polka dots) side of ATC tabbed card and then they will fill out a blank ATC card with their words of wisdom, advice, etc which will be placed behind the ATC tabbed card – like a file system. The extra ATC tabbed cards will be used for the photos of the day’s festivities. This way I can enjoy a small, yet compact way to store my memories for the day!
Here they are tucked away ready to celebrate the day! Neat, small and simple.

I added a crystal book knob to the top for added flair!
Not intended to be used as the handle to ‘open’ the tin – just decorative.
The hole can be achieved by the simple use of a small drill or other piercing tool.


My tiny tin is all dressed up and ready for the party on Saturday!
Creative cheers,
Rachel
The goodies for the challenge could not have been more perfect timing. I will celebrate my ‘2ND” annual 40th birthday this Saturday. I wanted a way to collect my friend’s thoughts, advice, etc in a special place. The tin would be a great way to capture the day at breakfast and a vintage market for the day.
The Barcelona paper is delish – I love polka dots –
I knew what the outside of my tin would look like right away!
 Cut paper to fit tin. In this case I simply cut a 12x12
sheet of paper sized perfectly for the tin.
Use the full length so that you can
add a ‘fold’ around the backside for a clean edge.
 I used Super Tape by Therm O Web to ensure a secure hold.
Super Tape is not red; it’s the protective covering for a double-sided tape.
Do not forget to add extra for the flap in back.

 Because I love the strips of words on the 97% Complete Sticker-G is for Gypsy,
I thought I would add it to the top of the lid for a complete look of sorts.
The words will also describe the kind of day we will
have at market on Saturday. These stickers give any ‘edge’ a great look!
 Now it was time to use the new Paper Tape by 7 Gypsies! This stuff is great. Tears easily, can also be used like the strips of words, etc. My favorite is the Victoria patterned paper tape. You get three different rolls in the package (5yds each); navy with creme polka dots, pink and creme stripes, and one the looks like a measuring tape (that's my favorite). I have been sewing a lot these days so I felt that the measuring tape was a great way to highlight this new love in my life right now.
 TIP: For this project, I found that pulling the paper tape off a little at a time as you go around the tin works best. Allow for extra on the end so you can overlap the two OR simply tear at the end for some messy, eclectic flair – like life in my 40’s has been – ha!
 I decided to punch a hole in the tin so that I could add a brad. The tin is smooth enough for a Crop-A-Dile to punch a hole right through. It worked best on the side because that was the only way I could fit the Crop-A-Dile to go ‘in’ the tin to punch. If you find another way, please let me know! Of course, you could easily ‘drill’ a hole in the front if you really wanted a brad on the front cover of the tin as I did for the top of the lid.

I stamped the 97% Complete Journal Stamps – Travel on a blank ATC card for the front of the tin. I felt this would be the best way to describe the day. AHEM, my ‘2nd’ ‘annual’ 40th is a big deal after all…in my mind at least. GULP.
 I added the backside of the Barcelona paper –Sabadell (the stripes), on the lid... a great contrast to the polka dots. I love double-sided paper!
 I then added some Hudson Valley Ribbon around the bottom edge and accented with another brad. I snipped the legs off the brad so that it could lay flat on the ribbon.
 Now it was time to play with the ATC tabs and the 6x6 Victoria pad which is also double sided. I feel that paper at this size works best on smaller items, hence the black ATC tabs. Make sure you apply paper to both sides of the tabs so that the notches on the tabs are covered up – you don’t want the notches to get in the way when stored in the tin. These notched tabs are also used for the ATC Revolving Holder. Don’t be afraid to improvise and use them for other things!
 I also added paper clips to each tabbed ATC card. It’s best to put the clip on paper first and then add adhesive. This will lock in the paper clip so that it will not come off when taking in/out of tin, etc.
 Again, CHEERS for double-sided paper at this size – allowing you to take the guesswork out of what to use on each side. You’ll notice that I also added strips of words from the Gypsy 97% Complete Stickers for the edges to cover up paper cut too short, etc. See, yet another way those strips of words come in handy.
The idea is as follows: I will place a photo (taken at party) of each guest to the non-patterned (save for a few polka dots) side of ATC tabbed card and then they will fill out a blank ATC card with their words of wisdom, advice, etc which will be placed behind the ATC tabbed card – like a file system. The extra ATC tabbed cards will be used for the photos of the day’s festivities. This way I can enjoy a small, yet compact way to store my memories for the day!
Here they are tucked away ready to celebrate the day! Neat, small and simple.

I added a crystal book knob to the top for added flair!
Not intended to be used as the handle to ‘open’ the tin – just decorative.
The hole can be achieved by the simple use of a small drill or other piercing tool.


My tiny tin is all dressed up and ready for the party on Saturday!
Creative cheers,
Rachel
17 comments:
I love this! If you were next door, I'd run over, get all these supplies, and make this today. *sigh* I think I'll just have to place an order as this morning is not so busy for me. :)
Every step you posted made me love it more. Super!!
Absolutely gorgeous!
And so easy to make.
I just love the Gypsies line.
xoxo
Wow, that's fabulous! I love the end result.
beautiful!!!
I love your tin and your instructions are great. Happy 2nd 40th year.
Really cute!Thanks for the inspiration.
xoxo
Cindy B.
You are so FABULOUS!
Enjoyed seeing it in person on your b-day!
Thanks for sharing it all!
XOXO
B.
It was so awesome to see this in person! It looks fantastic and is a great keepsake :)
Super cute!!! TFS!
You are a creative soul!
love the polka dot paper! and measure tape 2 cute!
thanks for the info on how to make...i might just have to scrap lift :)
SOO cute! Love this tin!
Usually when I decorate a tin, I will cut the paper that I will use to decorate the outside to size. Before I adhere it to the tin, I decorate it and add brads and such right through the paper, but not the tin. When I'm finished adding things like brads, I adhere it to the tin and then add finishing touches. Hope this helps someone! :-)
wow this is gorgeous. I love it.
thank you so much for the inspiration...LOVE IT!!!
ohhh and the mid release makes my heart pitter patter!!!
Adorei...
I just love your tin!
Lisa
i LOVE that tin! i agree with jmquilts...a placed order is pending here in my head!!!
I just picked up one of these wonderful tins last night. Thank you so much for the super tutorial. I especially love the way you added the knob on the top of the lid. Very clever.
Post a Comment