Menu

Showing posts with label binderie. Show all posts

Tuesday, February 14, 2012

from our workshop: cha winter sneak peek #6

Our final peek at the new 7gypsies products is showcasing some of the new surfaces for artists of all types to create with.


Many of you may have heard of "tryptichs" these often have religious association and are often seen in renaissance art.  Really, the term tryptich is used to describe a 3 panel work of art.

We were quite inspired by the works of tryptich art that we've seen in our travels and are now starting to see many mixed media artist using gravitating towards these as new art forms.


We developed a tryptich house kit.  There are 3 house shaped panels in our kit along with all of the pieces that are diecut from the window panes.  These little extras are great for creating layers or even transforming the openings into shadowboxes.


We also created an arc version of the tryptich kit.  
This clever gypsy artist chose to use the kit as a cover for an art journal.  There are so many fun ways to transform these kits~ create a 3 panel project, use the shapes as pages in a book or even stack them on each other for a layered effect.


Another fun kit made from sturdy bookboard is the new banner kit.  We've all seen how popular banners are for home decor, parties and more.  This a slightly larger version of a banner and here's a little gypsy tip:  if you need more shapes that the 6 included in the kit, you can use the pieces as tracing templates to create more banner shapes from paper, fabric, bookboard, metal~ whatever suits you!


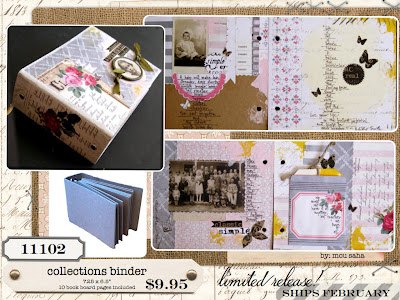
This limited release collections binder is a mixed media artists' dream.  Because both the cover and all 10 pages are made from thick bookboard, you can paint, mist, staple, sew and collage to your hearts content and the pages won't warp.


A few last additions to the new release include 2 brand new tickets.  Our tickets are HOT!  We pulled some of our favorite vintage designs to create the vintage tickets and the journal tickets are a slightly larger version with plenty of space to add your own thoughts.  Don't forget to layer them into our ticket holder along with photos and other findings for a unique desk display.


And finally~ one last set of metals.  These mini vintage clips are so DARN cute we can't stop using them on everything!  Think banners, papers, clipping a photo to a page, wall displays, magnet boards and much much more.  

We hope you've enjoyed a little peek at our latest collections from the journey!
xoxo, the gypsies

Saturday, October 3, 2009

7gypsies book covers

This week we have found some interesting uses for our 7gypsies book covers (one thanks to a little bird who told us where to find it...thanks Beth!). See, we really do read the comments you leave us.

We love when our products are used in different ways than we might have intended them to be used (that's so like us gypsies, isn't it?)
So back to the ideas...

Book Cover-Victoria


This inspiring project by Wendela was created for her wedding anniversary.
You can find out how she did it here on her blog.


And a great idea from Beth...she turned 2 sets of different covers on their side to make a zig-zag journal for her brother...very clever. You can see the tutorial on her blog (we love tutorials with step by step photos!) Thanks Beth!


We also have two more book covers that arrived at CHA this summer...come back on Monday for a FABULOUS book project using one of them...we guarantee your gonna love it (and it might inspire you to take a trip to Paris!).

PS) if you have used one of our book covers in an unusual way (or even in the standard fashion) we'd love to see it! Just post it to our member gallery.

Monday, July 20, 2009

And the winner is...


We are so excited to finally announce the winner of the Ultimate Binderie Giveaway!  It took us a few extra days to decide because we were so thrilled with the creative entries that we received.  Check out the fabulous prize package pictured above that goes to our lucky winner!!  There are all kinds of goodies from our friends at Cosmo Cricket, Basic Grey, Bo Bunny, Ten Seconds Studios & Tim Holtz.  Plus we even added some of our BRAND NEW CHA Summer release products!!  Victoria papers, all 4 new 97% complete stickers and our favorite new product from 7gypsies... Paper Tape!!  

What is paper tape you ask?  Think masking tape, the coolest masking tape you've ever worked with in all kinds of colors and printed patterns to choose from.  It's the perfect embellishment, adhesive or just downright fabulous addition to your gypsy toolkit.  Click HERE to see the full line up!

We ooohed and ahhhed over the blinged out creations and felt a bit of gypsy pride seeing some of the travel and gypsy themed punches.  We were blown away with some of the over the top creations that came from all of you BUT...

our winner is Carol Weimer!!  

Congrats gypsy girl!  You will be in bookbinding bliss with the prize package we're shipping off to you including a brand new binderie punch!  Plus your punch will enjoy gypsy fame and glory at our CHA booth where it will be displayed amongst all of our other altered binderie punches!

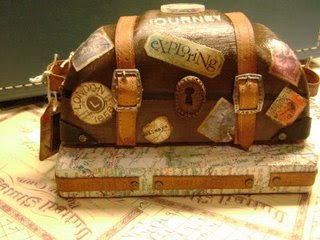
Here are a few photos of the winning punch and you can read more about how Carol created this little gypsy trunk on her blog by clicking HERE.

Congrats Carol and many thanks to all of our loyal gypsies who entered the Ultimate Binderie Giveaway!


Thursday, June 18, 2009

Ultimate Binderie Giveaway extended!

Good news gypsies! We have decided to extend the Ultimate Binderie Punch giveaway until July 15th. So all of you out there who are on the fence about entering the contest... here's your big chance. We want to see your creations no matter how outrageous or gypsified they may be.


We also wanted to show you a couple of new videos using the Binderie Punch. Watch as one of our gypsies punches through some outrageous materials using the Binderie or as Jennifer Mcguire creates a mini album using grungeboard and the Binderie. We also loved the videos that 7gypsies artist, Paula Cheney recorded on vacation with her nieces. You'll learn a lot watching these darling girls bind their own travel journals.


Enjoy!


Wednesday, June 10, 2009

Your decorated Binderies, Winners & More Giveaways.

First of all we'd like to welcome our first 2 entries into the Ultimate Binderie Giveaway contest!! 

You brave gypsies did us proud... now the rest of you start getting messy and enter your altered punches to win!  Did we mention that if your punch is voted as everyone's favorite that you'll get loads and loads of goodies from all of our favorite manufacturers as well as some serious 7gypsies swag AND your punch will be featured in our booth at CHA summer??

It's easy to upload your decorated photos into the contest gallery.  
  1. click on the link below
  2. register (it's free!)
  3. login
  4. click on upload photos  
Click HERE to enter our Binderie Punch gallery and see more views of the new entries below!

 
So let's announce the winners of our giveaway.  These 3 lucky gypsies will be getting their very own binderie punches to play with:


rebecca lucille
kelly todd
CoRinne not connie

You are our big winners!  Now we know that you'll be decorating your punches and posting them in the gallery... right?? wink.wink.  Email us your addresses so we can get these out to you asap!

For those of you who didn't win... don't despair!  You have lots more chances at winning a binderie punch by following our Gypsy Gossip section!  We'll keep you posted on who's doing binderie punch giveaways all month long.  

In fact, RIGHT NOW, today, 2 of our artists friends are doing binderie giveaways!!  So pop over and say hi and try your gypsy luck there.

Donna Downey's giveaway:  Click HERE
Vicki Boutin's giveaway: Click HERE

Not feeling lucky?  Then just take the plunge into bookbinding bliss and BUY a binderie punch.  (we know you'll fall in love with it!)  

Click HERE to see which of our online stores that have the binderie punches in stock and ready to ship!!

Thursday, June 4, 2009

Oh gypsies this is big!


This month it's all about the Binderie Punch here at the gypsy workshop.  

As you know, we LOVE our Binderie Punches.  So we decided to invite some of our binderie punch lovin' gypsy friends and our gypsy artists to play.  We asked them to decorate their Binderie Punches so that they reflected their own personal style and we are delighted with the results!!  

Check out a few of our favorites:


But these are just a small sampling of what's in our brand new Artists Series binderie punches.  We've got an entire gallery of these works of altered art! 

Click HERE to see the rest of them and read about our favorite products to punch.  Be sure to check out our 7gypsies founders- Steve & Donna Smylie's funky punches.

But let's be honest, what fun would this little Binderie Punch playdate of ours be without YOU, our fellow gypsies??  We're inviting you to join in the fun and not only that you'll have the chance to win Gypsy Fame and Fortune!!!

It's simple... decorate your own binderie punch, take photos and post them in our contest gallery by clicking HERE.  You have until June 30th to enter to win:


Yes YOU could win a HUGE prize package full of goodies from our gypsy friends at:

Cosmo Cricket
Tim Holtz
Basic Grey
Ten Seconds Studios
Bo Bunny
7gypsies 
Prima Marketing
 and more...

PLUS~  If your artists series Binderie Punch is voted the best decorated punch it will be featured in the 7gypsies CHA Summer booth!!  What more could a gypsy ask for??

So to kick things off we'll be giving away 3 Binderie Punches for you to start altering in true gypsy fashion.  To enter to win one of these punches simply post a comment about the Binderie Punch.  We will draw 3 winners on Wednesday, June 10th!  

Good luck gypsies and we can't wait for you to play with us!

For more details on the Ultimate Binderie Giveaway click HERE.

Friday, January 2, 2009

Binderie Punch project continues...

Now that we've shown you just how easy it is to create a basic journal with the fabulous new binderie punch, let's finish it off with a few easy inclusions.  You'll see how fun it is to add your own ephemera, photos and findings to create your very own album!  And all at the simple push of a button...  aaaah, a little piece of gypsy heaven!

First gather your supplies...

1.  The Binderie Punch   
2.  Any of your own ephemera- photos, cards, letters, receipts~ hey it's your journal.
3.  Our journal cover has been transformed using a clever collage of the Family ATC sticker 
4.  We've used the new journal clear stamp (you can't live without this one!) and gaffers tape  to embellish the cardstock pages in our journal
5.   Journal Pack:  We've used pieces from the Moulin pack.  These journaling packs are perfect additions to your binderie toolkit~  they come with index tab pages, journal pages, journaling cards, pockets, envelopes and stickers all unpunched and waiting to pay a little visit to the binderie punch and added to your favorite projects.
5.  Crystal knob- it's a beautiful way to finish off your cover.
6.  Binding ring dangles- Every true gypsy can't wear enough jewelry and these darling little dangles are just that... jewelry for your binding rings!


We'll start by drilling a hole in the cover for our crystal knob.  The binderie punch offers the versatility to punch just 1 hole if that's all you need.  Just use the markings on the front of the punch to guide where your holes will be punched... mini arrows mark where the holes will be drilled, small line gives you a center guide.

Lay one of the cardstock inserts that you've already punched on top of the cover as a guide for where the holes will be drilled.  For the knob, we'd like to drill a hole in the center of the cover so we will make sure that we line up the center hole at one of the arrow guides on the front of the punch.  Because the bottom edge of our cover doesn't reach the other arrow guide, there will only be 1 visible hole punched.


*Make sure you slide the cover all the way into the punch until you feel it press against the back.
Press the top button to drill 1 hole.Once the hole is drilled you can add your knob!  
Next, collect your ephemera and other findings that you'd like to add to the journal.  You'll see we've collected photos and various pieces of the journal pack that we've added our journaling to and stamped on using the Savannah Alphabet clear stamp.Now here's where the little Binderie punch really shines...  gather ALL of the ephemera (up to 8 pieces at a time) and slide them into the punch.  Press the button to drill your holes!Remember to use the button on the sliding arm to guide you when punching your center hole.  (see our last posting for detailed directions)Here are the different cardstock pages, journaling pack elements, photos and other ephemera that we have drilled holes in for our journal.  Keep in mind that with the easy to use binding rings you can add as many pages to your project as you feel inspired to!  Just use your Binderie punch to drill holes in your findings, pop open the binding rings and add them to your book!Here is a quick shot of how fun our little inclusions journal looks when it is assembled.And finally, give those binding rings a bit of gypsy flair with some dangles in assorted gems... sapphire, pearl, crystal, silver or ruby~ or better yet mix & match a few of each!  We've even seen a few of our fellow gypsies tie ribbons, bottles, trinkets and charms to their rings.
You've officially created your first handmade book in just minutes.  Perfect for tucking your precious family memories inside.


Thursday, December 4, 2008

All I want for Christmas...

Is the new 7gypsies BINDERIE PUNCH...or as our gypsy friend Wendy from Bad Girls Kits calls it... "the little red hottie". We thought we would walk you through some basic steps to making a journal. You will be surprised how simple it is to use!


Step 1-Gather supplies
  1. The amazing Binderie punch!
  2. 1 package 7gypsies 6 x 6 black board (we used 2 of the 4 pieces that come in the package for the front and back covers)
  3. 3 sheets of 12 x 12 Bazzill cardstock (you can use whatever you have on hand). Cut the cardstock into 6 x 6 squares to match cover size.
  4. 3 medium black binding rings- the rings may look large for the size of the book, but after you add embellishments and photos you will need this size.
  5. pencil
  6. ruler
Step 2- Pull out the arm
The bindery punch has an arm that slides out from the right side of the punch. You must pull the arm out one notch (it will click into place). This arm will allow you to drill holes the same distance apart, whether you need 3 holes or 10.


Step 3- Mark your paper
Mark the center on one side of cardstock as shown. Since our cardstock is 6 x 6 we marked it at 3". You only have to mark one piece of cardstock because the Binderie punch will drill through multiple sheets (we are doing 8 sheets in the example) so all will be punched together. Easy huh? All the holes lined up with only one measuring line...so easy.
(TIP: the cardstock will slide into the Binderie punch about 1 1/2" so make your mark long enough so that it does not disappear when you slide the cardstock into the punch)


Step 4: Line up and Punch
Slide the stack of cardstock into the Binderie punch (all 8 sheets)...make sure you push the stack all the way back. Line up the center mark on the top sheet with the Binderie center mark and push the button. That's it...you've just drilled your first two holes.


Step 5: Adding a hole...or 10
It is so easy to add more holes to your project. (Make sure the arm is pulled out from the body of the punch) Place the right hole that you have just drilled in the stack of papers on the "button" found on the arm. Push the stack of paper all the way back and push the button on the top again. Now you have three holes!

TIP: We have found that the easiest way to get the paper/book board out of the machine is to swing the paper out and then lift the stack off "the button" as shown below. Remember...punch, swing out, lift off...very simple.


Step 6: The cover
The cover is done exactly like the pages but there is no marking needed. Just use that same piece of cardstock you have already marked. Lay it on top of the book board cover about 2" from the top as your guide (remember, our cover is black book board). Slide in, line up the markings and punch.
Of course, if you like you can always measure and mark the cover if you choose not to use the previously marked page.


The finished book-
From start to finish it took 10 minutes to make...and that included cutting the cardstock.

Keep watching and you can see the book build...we'll add some very basic elements like the 97% complete ATC sticker -Family  , learn some cool binderie ideas and add some fun things as inclusions. The binderie punch works great for adding ephemera...so quick, you better have a big stack because you won't want to stop!

Friday, September 12, 2008

Day 5

#5. Binderie punch
Since we talked about the journaling kits yesterday that need holes punched in them to make a journal, we thought today we better talk about how to do that!

From our gypsy workshop we have created the new Binderie punch. Small enough to hold in your hand or take with you to a class or on vacation. This little machine is a battery operated (so you really can take it anywhere) and is so fun to use! With the push of a button on the top of the machine it punches 2 holes, 3 1/2" apart...if you want 3 or 4 holes you just slide it down and punch again. It will punch through chip or book board (like butter). No more picking the left over book board out of the hole puncher so you can move to the next hole!! The binderie punch punches a clean hole and all the left overs can be found in a little tray underneath. So convenient! I almost forgot you can even punch 6-8 sheets of paper at a time! Making a journal just got easier!

The punch even comes with a starter kit; a 5 x 5 book, 6 pages and 2 rings.


Since we have this great new tool we needed some great new products to go with it. Not only did we do the 3 journaling kits that we talked about yesterday but we have also created 2 new board kits you will find below.

Home Sweet Home
#11067
5 x 8 1/4"
Punch holes on the sides with the binderie punch and hook together with rings or ribbon. The book stands like an accordion on a table.
Vacation
#11068
4 1/2 x 7"
This one can go together like the Home Sweet Home book or you can punch holes at the top and bottom of each panel and hang it vertically on your wall. What a great idea to showcase your vacation photos!

Hope you like the new binderie punch...we do!
(Your gonna want one of these)

Thursday, September 11, 2008

Day 4


#4. 97% Complete Journal Kits (8 x 8)
Favorite item number 4 of our top ten list is the new 8 x 8 journal kits. There are three different designs, all very distinct in style and color. Everything you would need to create a complete journal. Each kit comes with 6 different 2-sided papers designs (the designs are different on the front and back), tabbed pages to use as dividers, journaling cards, pockets and a sticker sheet. These were created to go with the binding punch (which we will talk about in a later post) so that all you need is 2 pieces of 8 x 8 chipboard (for a cover), 1 journaling kit, 2-3 binding rings, the binding punch and wallah! you have a journal that is 97% complete...you just need to the add the last 3% with your pictures and stories. Did we mention the whole darn journaling kit is just $9.95? Well it is!


Journal Pack-Savannah #21042
35 piecesI wish these pictures were closer so you could see the pages...they are beautiful...

Journal Pack-Moulin #21044
35 pieces


Journal Kit-Grid-it #21043
35 pieces

That's all for today...see you tomorrow when we will continue our quest for the Top Ten favorite things from the summer release.