Menu

Showing posts with label vintage holders. Show all posts

Wednesday, October 31, 2012

look what we got: Epicurean collection!

Introducing the Epicurean Collection

gypsies are you ready to win this great collection of foodie inspired goodies from our new Epicurean line? this very fun Mini Librarie Drawer is filled with 7gypsies new products and we hope we will inspire you to bring a little vintage into your kitchen...
our new Epicurean collection takes us in two very exciting directions. these very cool vintage "almost" naked pieces that are the perfect starting place for any foodie, recipe, restaurant project you have up your sleeve and full color beautiful prints that take you around the globe with food fare in mind. post below for your chance to win this very fun box of tidbits that we know you will want to get your hands on. post the name of your favorite recipe and you will be eligible to win the package above!

we wanted to share a little bit about some of the new items to get your juices flowing...all of these items are now live on our shop and ready to be shipped from a retailer near you.
Naked Tri-Fold Journal Cards - 6 pieces of "almost" naked cards that measure nearly 12" long when fully opened and fit right in our mini librarie drawer. each card has printed lines on both sides with room at the top for a title, recipe name or other special detail. these cards are perfect for jotting down your favorite recipe, notes about a great wine, a listing of your favorite restaurants or to include any of your 7gypsies projects where a little journaling is the perfect touch.
Epicurean Mini Ephemera - 15 pieces of vintage ephemera with a foodie theme. ranging in size each on has its own fun personality.
Recipe Tabs - 2 each of the following printed tabs: starter, soup, salad, entree, side and dessert.
lines are included on the front for special notes or to journal a little something. the backs are blank, so simple turn them over to add any additional tabs or details.
Recipe Tag Inserts - 8 varieties of tags that fit perfectly into the mini librarie drawer as is or cut them up into individual embellishment pieces and add them to your projects. 3 of the styles offer plenty of room to write a recipe or two and the others are filled with foodie inspired icons, measurements, words with a vintage twist. each pack comes with 2 each of 8 designs.
Epicurean 6x6 paper pack - filled with 48 sheets of perfectly reduced in scale two sided papers that are just right for adding to your cuisine projects. one side is filled with vintage graphics while the others are simple restaurant inspired backgrounds. 
Mini Librarie Drawer - 4 perfect compartments to hold lots of goodies. it was our inspiration piece as we developed our Epicurean collection with the goal that both new and old would come together fitting perfectly in this space.

if you want a chance to win this collection please share with us the name of your favorite recipe name here on the blog or on Facebook and we will put them all into a hat and choose the winner in 24 hours from our posting time.

Thursday, October 25, 2012

sneak peek: new trays!

Fellow gypsies!

we thought we would introduce you to each of the new products and spread a little gypsy cheer.
knowing it's been a while since we've had a contest for our most favorite gypsy fans -
we will be giving away a prize with each new product blog post over the next week or so.

new vintage stained trays:
we have been so busy in the workshop creating new surfaces to inspire your
vintage soul and get your creative juices flowing!
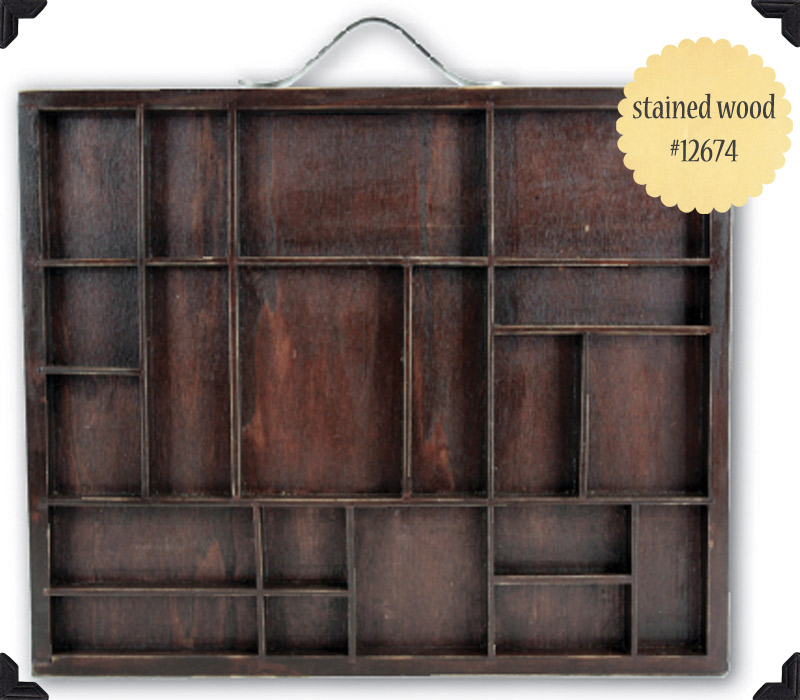
we are so excited about our newest trays, they are stained with a beautiful vintage feel.  
two trays are available in this new finish - the solo and the letterblock
we are going to give one of each of these trays away to two lucky winners.

just leave a comment telling us what theme you would choose if you were to win one
of these great trays 
leave your comment by October 26 at 3:00 pm CST and you will be eligible to win one of the trays!

5 fun facts about our trays:
1. each tray is hand stained and finished to create the vintage feel we all love so much!
2. the letterblock tray has 20 assorted compartments
3. solo trays hold a 4x6 photo and has three 2x2 compartments. our solo trays were a huge hit with gypsies all around the globe! so why wouldn't we add this beautiful deep stained wood to the collection? swoooon...
4. the letterblock trays feature a metal handle - perfect for hanging
5. the letterblock tray has inspired many gypsies to create every kind of project, with it's
random size slots - every project becomes unique!


we love the black and brown - but how about this new, rustic stain? we know you want to grab one right now and get creating - but just wait gypsies - there's more new for you to see!

the shop is now open with these great new items, check them out and start working on your projects right away.
stay tuned for more new product releases and more chances to get your hands on some great new 7gypsies goodies.


Tuesday, May 15, 2012

from the studio of: ranjini malhotra


postale library drawer
by ranjini malhotra

7 gypsies supplies:
Gaffer Tape - Nottinghill
Librarie Drawer with Index Cards
Librarie Drawer Naked Sidetabs
Paper Tape - Postale
Tag Envelopes - Postale
Tag Inserts - Postale
Index Envelopes - Postale
Index Cards - Postale
Petit Carnet - Rue/French
97% Complete Stickers - Always
Lille Paperclip Dangles
Avignon Paperclip Dangles
7 Gypsies Tags (Vintage & Victoria)

Other Supplies:
Mini Paris Envelopes (Zulio.com)
Paris Stickers  (Cavallini)
Trims: red seam binding, red/white baker's twine, blue/cream striped linen ribbon, red twine, eyelet lace trim (1.5")
Vintage Buttons
Photos, Ephemera, Index Tags

Postale Librarie Drawer
When I spied the Postale Collection from 7 Gypsies, I was so excited to be asked to create this project! I wanted to recreate the look of a cherished box of letters tied with ribbons, chock full of photos, ephemera, tickets, tags, memories, all tied up with pretty ribbons and buttons. The key for me was to work within the Postale palette. When you are pulling together supplies for this project, look for things you already have that will work with the palette - the addition of the vintage buttons, the trims etc. give an authentic feel to this project and is also visually pleasing. You'll love and cherish the finished project! 

Instructions
1. Use a Phillips screwdriver to unscrew the screws on the metal handle of the Librarie Drawer. Remove hardware and set aside. 
2. Cover the front of the librarie drawer with Nottinghill Gaffer Tape, trim to fit.
3. Replace the metal handle on the face of the drawer, the screws will pierce the gaffer tape as they are screwed back in. 
4. Assemble the drawer contents adding postale envelopes, inserts and photos. Journal on some of the inserts, you can adhere photos directly to the insert or envelopes and add journaling as well. Address the envelopes if you like, add vintage postage stamps. Use your imagination - you're creating a letter box full of memories! 
5. Add other ephemera from your stash - letters, tickets, tags. 
6. Tie mini postal envelopes with red and white baker's twine, securing the centers with a vintage button. 
7. For the very front portion of the drawer, layer the tag envelope shown on top of the postale index card shown. Use a circle punch to punch out a photo and center it within the circle on the tag envelope. Add the A sticker from the 97% Complete Stickers to the left side of the postale index card. Use a small circle punch to punch a half circle on the left side of the index card. 
8. I wanted the drawer to look as if it contained stacks of old letters and cards, tied together with ribbons. To imitate this look, you can stack journaling cards/envelopes/photos/ephemera of similar size and tie them together with ribbon as shown.  Repeat this several times to give the drawer fullness. 
9. Lots of little touches bring the drawer to life - add paper tape on the Naked Sidetabs, use paperclip dangles on the envelopes and inserts, fashion a rosette from fabric trim with a few stitches and a button for a center. The key is to add lots of color in the postale palette - look for the reds, whites and blues that make up the postale palette and bring those in through selecting trims and vintage embellishments in the same palette. 
10. You can add a petit carnet from 7gypsies in the back, mine was from a previous project and it fit nicely in the drawer for storage. 

Tuesday, February 14, 2012

from our workshop: cha winter sneak peek #6

Our final peek at the new 7gypsies products is showcasing some of the new surfaces for artists of all types to create with.


Many of you may have heard of "tryptichs" these often have religious association and are often seen in renaissance art.  Really, the term tryptich is used to describe a 3 panel work of art.

We were quite inspired by the works of tryptich art that we've seen in our travels and are now starting to see many mixed media artist using gravitating towards these as new art forms.


We developed a tryptich house kit.  There are 3 house shaped panels in our kit along with all of the pieces that are diecut from the window panes.  These little extras are great for creating layers or even transforming the openings into shadowboxes.


We also created an arc version of the tryptich kit.  
This clever gypsy artist chose to use the kit as a cover for an art journal.  There are so many fun ways to transform these kits~ create a 3 panel project, use the shapes as pages in a book or even stack them on each other for a layered effect.


Another fun kit made from sturdy bookboard is the new banner kit.  We've all seen how popular banners are for home decor, parties and more.  This a slightly larger version of a banner and here's a little gypsy tip:  if you need more shapes that the 6 included in the kit, you can use the pieces as tracing templates to create more banner shapes from paper, fabric, bookboard, metal~ whatever suits you!


This limited release collections binder is a mixed media artists' dream.  Because both the cover and all 10 pages are made from thick bookboard, you can paint, mist, staple, sew and collage to your hearts content and the pages won't warp.


A few last additions to the new release include 2 brand new tickets.  Our tickets are HOT!  We pulled some of our favorite vintage designs to create the vintage tickets and the journal tickets are a slightly larger version with plenty of space to add your own thoughts.  Don't forget to layer them into our ticket holder along with photos and other findings for a unique desk display.


And finally~ one last set of metals.  These mini vintage clips are so DARN cute we can't stop using them on everything!  Think banners, papers, clipping a photo to a page, wall displays, magnet boards and much much more.  

We hope you've enjoyed a little peek at our latest collections from the journey!
xoxo, the gypsies

Thursday, January 5, 2012

this month: january

beauty surrounds us...
"birds have wings; they're free; they can fly where they want when they want. they have the kind of mobility many people envy." ~ roger tory peterson
our january picks: 1. mini ephemera - vintage 2. 6x6 conservatory paper pack 3. conservatory clear stamp 4. 12x12 conservatory papers 5. natural history rubbings 6. nature charms  7. conservatory 97% complete tags 8. ticket holder  9. conservatory alpha & numbers chip

Don't forget to join us or become a follower of our blog to stay current on all things gypsy.

Friday, December 9, 2011

facebook friday: stepheney fenton


Congratulations
 Stepheney Fenton
your crafty ticket holder is our 
Facebook Friday pick this week!

Thursday, November 10, 2011

projects and inspiration: christmas gift ideas!

is it really almost Thanksgiving gypsies? PHEW! 
time sure does pass quickly, sometimes quicker then some of us would like....

we are getting soooo excited for christmas here in the gypsy workshop, 
our design team has already been busy creating a few gift ideas for our fellow gypsies...
this adorable ticket holder full of daily reminders was created by our gypsy Mou! can you see all those new years resolutions stuffed in here? 
or little quotes for a beautiful way to remind someone to smile!! we love how she placed the rulers on the front...
paula created this inspiration board made from our 4x6 photo tray! don't you just love how she has the glass placed over the sections to create a "pocket" to store all those fun trinkets that inspire you! 
add a little cork board to other sections and voila! 
and don't forget about the gorgeous butterfly rubbings - swooooon.
didn't paula do such a great job?!?! we think so...
ohhhh who doesn't love a convenient recipe book - that is THIS adorable?!?! 
so simple - our gypsy ann used a book cover for the back and front, then using the clear sleeves and tabs that come with the 4x6 photo stand to store the recipes. the clear sleeves protect the sacred recipes from messy cooking - because we all know creative cooking is always a mess :)
keep following gypsies we will be posting some more gift ideas throughout next week!

Thursday, November 3, 2011

artist advent blog kit: section #12 by the gypsies

Section #12 - by a few of the gypsies!
Materials: (all 7gypsies)
Paris Tissue
chipboard (or 7G packaging)
ATC Photo Display tag (ruler)
Tag Kit: Affirmations (#12)
Paddington chip alpha
(3") Venice gaffer tape


Other:
2"x3" photo


Project tips:
- you can substitute the 7gypsies packaging in the kit for any of the chipboard/book board needed. be very careful when opening the packaging if you would like to use it.
- keep ALL your paper scraps from each section, you will need them for section #11
- you can use scissors in place of all punches
- you can use the purple ribbon in the ATC Photo Display kit in place of any string and wire

Instructions:
1. grab the letters "l o v e" from the paddington chip alphabet (or any word you want), coat the letters in mod podge (or other wet adhesive) and cover in glitter. set aside to dry.
2. cut 3 strips of tissue that are 4"x1" long and 3 strips that are 3"x1" long. scallop one edge of all 6 pieces.
3. use mod podge or tape runner to glue the straight edge of the tissue to the right and bottom inside edges and the upper edges of the receipt holder - one piece of tissue at a time, stacking on top of each other.
4. cut 3.5" of gaffer tape and cut a "v" into each end. stick this on the bottom of the receipt holder, on top of the tissue with the bottom scallop edges showing.
5. glue "love" on top of the tape.
6. grab the card with the ruler from the gypsy kit and your 2x3 photo. glue the card on the back of the picture so that the ruler is showing on the left edge of the photo. trim off any remaining edges of the card. slip the picture behind "love".
7. place the "#12" in the upper right corner with a glue dot.

Finishing touches:
1. fan fold Venice gaffer tape and wrap around the apothecary bottle.
 2. tie black ribbon from ATC Photo Display tag kit.
 3. weave the brown ribbon from the ATC Photo Display tag kit into the chain and attach crystal dangles (ones with 4 crystals on them).
4. fill apothecary bottle with glitter or item of your choice. using leftover brown or black ribbon, tie the apothecary bottle to single crystal dandle and clip to top center.
And there you have it gypsy friends! The project is now complete. We hope that you enjoyed creating with our design team and staff and can't wait to see pictures of your own version of this wall hanging. Don't forget to visit our Facebook page and post your projects!

Tuesday, November 1, 2011

artist advent blog kit: section #11 by the gypsies

Section #11 - by a few of the gypsies!
Materials: (all 7gypsies)
Tag Kit: Affirmations (good things, sow a character, #11)
(4") Venice gaffer tape
(4) Display trim pyramid studs
ATC Photo Display tag (calendar tag)
Lille clear stamp (3kr., ledger)
All the Lille scrap paper you've kept throughout the project
(3) black naked labels
Other:
index card print from developed film or 3 tiny photos (about 1/2"x1/2")
string
black stamping ink
mod podge (or other adhesive)


Project tips:
- you can substitute the 7gypsies packaging in the kit for any of the chipboard/book board needed. be very careful when opening the packaging if you would like to use it.
- keep ALL your paper scraps from each section, you will need them for section #11
- you can use scissors in place of all punches
- you can use the purple ribbon in the ATC Photo Display kit in place of any string and wire

Instructions:
1. If you haven't done this already, you will want to find the section #11 clip area and flip the receipt holder over. using pliers or other tool, bend the clips so that they come loose and the clip comes out completely.
2. Grab all the scrap pieces of the Lille papers and cut them into uneven, crooked, strips of paper. find your least favorite card from the affirmations tag kit and start gluing the strips of paper to create a "striped" paper.
3. Use your distress ink (or stamping ink) to distress the edges of the card.
4. grab the 3kr stamp from the lille stamp set and stamp in black ink (or whatever color you prefer) on the card.
5. cut small slits in the #11 tag, vertical, one on each side of the #11. cut another piece of the leftover lille papers or a strip from an affirmations tag to the size of the slits you made and slide it through. start at the front to give the look of a belt. place two pyramid studs on either side of the #11 circle and glue to "striped" tag.
6. we used pictures from an old index print for the banner pictures. using three (or however many pictures you want) blank labels, fold them in half over the string about 1" apart, to create a base to stick the pictures on. using a small amount of the gaffer tape, fold that in half over the string in between the pictures and trim to give a penant look. glue the small pictures onto the blank labels.
7. grab the "good things come to those who wait" card from the affirmations tag kit. stamp the small listing stamp on the back of the card in the upper left corner. glue the small calendar tag from the gypsy tag kit at an angle over the bottom right part of the stamp - DO NOT glue the hole in the tag as we will be tying the banner to that later. cut out a heart from any leftover papers you have or the back of an affirmations card and distress the edges. glue on top of calendar piece.
8. coat the "s" or the letter or number of your choice, in mod podge (or other adhesive) and gently lay a piece of the tissue paper on top. allow to dry for ten minutes. using a small nail file or piece of  sandpaper, gently file (rub) the edges of the letter until the excess tissue paper falls off. 
tip: don't try to tear the tissue, just keep sanding or filing the area as it will eventually sand off.


9. glue the chipboard letter to the back of the "good things come to those who wait" card, over the heart.
10. tie one end of the string banner you created to the hole in the top of the calendar tag. grab the gaffer tape and cut to the height of the affirmations card. cut a scalloped edge on one side. stick the tape down in section #10, just before the spring starts. attach the tape to the edge of the affirmations card to create a door. add the two pyramid studs, one on top and one on bottom.
11. grab the card with the #11 on it, position the banner so that when you open the door, the banner will pull tight. cut a small slit in the card and slide string into it and tuck behind the card and fit snug in the receipt holder.

Join the gypsies Thursday for section #12 and all the final touches! Other items you will need:
2"x3" photo