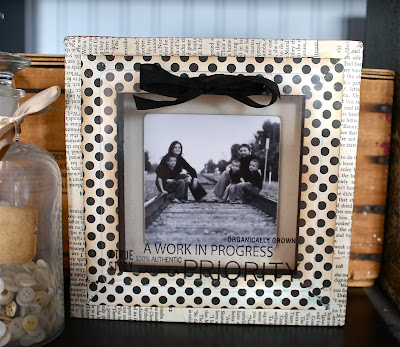
So here we are in day three of our acrylic challenge with another idea...think Christmas present here. So we asked you if you could figure how you could use a stretched canvas and a piece of acrylic to make a fun project...here it is.
Canvas Shadowbox
by Paula Cheney
by Paula Cheney
 Here's how she did it:
1. Start with a 8 x 8 stretched canvas. Paula used a canvas that was 1 1/2" thick to give the appearance of a deep shadowbox and one acrylic tabulated book (this book will give you two -6 x6" acrylic pieces with 2 holes on one side).
2. Cut paper strips from an old book or dictionary large enough to cover the side and wrap around the frame of the stretched canvas.
3. Use Mod Podge (matte) to adhere the paper to the canvas. Once the paper is adhered, paint a thin coat of Mod Podge over the paper. Let dry at least 15 minutes.
 4. Paint just the inside of the wood frame with black paint. Paula used Claudine Hellmuth's STUDIO acrylic paint in charcoal black for good one coat coverage. It's nice and thick. Make sure you do not drip onto the canvas below the frame.
5. Once the black paint is dry, add a band of 7gypsies Catalonia paper (from the Barcelona line). You can cut the paper into 1" strips and miter the corners as Paula did or cut a 7 x 7" square, then cut out a 6 x 6" square in the center to create the frame in one piece. Which ever way you do it, it really is simple!
This stamp is a must in your stash...it has 66 different stamps on one sheet!
 10. Run 7gypsies gaffer tape around the outside of the canvas for a little pop of color.
6. Using words from the Disclaimer clear stamp (Paula used: true story, priority, a work in progress, organically grown, 100% authentic and exhibit A) stamp onto the acrylic piece using Staz-on ink.
HINT: when using Staz-on ink on your clear stamps...wipe ink off right after use with a baby wipe and the ink will come off very easy and never stain the stamp.
7. Thread a piece of ribbon through the two holes at the top of the acrylic and tie a bow. Set aside.
8. Cut a picture 4 x 4" and mount on chipboard. Sand the edges, rounding the corners with the sand paper. Add three pieces of foam tape or pop dots to the back and mount directly to center of canvas.
9. Add the acrylic piece to the top with a strip of Therm O Web- Super Tape (one of our favorite products!) hidden behind the ribbon.
 10. Run 7gypsies gaffer tape around the outside of the canvas for a little pop of color.
Thanks Paula for a fun idea...now be watching for sales on stretched canvas's so you can get some Christmas presents in the works!
We sure hoped you enjoyed exploring acrylic...but we know you can think of more! So go to the gallery and post YOUR ideas for using acrylic in new ways!


5 comments:
Love this project, Paula!
Wow, Paula! You've done it again. Another amazing project. It took rereading and studying the pictures to figure out how you did it....I'm a bit slow, I guess!
Can you check your blog text color and background color? Both are black and you can't see any text between the pictures (except links).
great projet
Paula - this is utterly gorgeous. I love how you placed the acrylic on top of the canvas with the photo underneath. This looks like a frame out of the pages of Pottery Barn. You're amazing!
Post a Comment