Menu

Monday, November 30, 2009

Christmas Project #6


Gingerbread Cottage
artist Ranjini Malhorta


Ranjini used ACT cards to create this little cottage.  She covered the cards with a large dot paper-Matarro, small brown stripe-Terrassa, and our favorite red polka dot-Coloma .  The Barcelona papers are two sided so you get a lot of choices when it comes to dots and stripes.  Love that.
Ranjini taped the cards together with stripe gaffer tape to create the house.   
 
She painted and glittered shapes from 1 package of ATC chipboard. Then began to add all that glittery "gingerbread" to the little house.  She added a bit of bling to serve as lights and gumdrops on the roof.
Clever girl, that Ranjini.


We can just see a whole village of these little houses along the mantle...maybe a candy cane lane or a snow village.  
What would your village look like?

Friday, November 27, 2009

Christmas Project 5

Christmas Countdown Calendar
artist Paula Cheney

Now that Thanksgiving is over it's time to count down the days till Christmas.  And what do you need to do that?  How about this?  A very cool countdown calendar made by Paula using the new Photo Display Stand, cardstock and red polka dot paper, large binding rings , Princesca crystals and the Victoria clear stamp.  Super easy, in fact you can make it with paper you might already have in your stash.  You just need the Photo Display Stand and your Binderie Punch.  Fast and Easy...that's how we like our Christmas projects. 


You can find the step by step instructions here.  In fact if you email her she will even send you the Number PDF to print at home.  How's that for a Black Friday giveaway?

Wednesday, November 25, 2009

Gypsy Girl Life

Gypsy Girl Life is an ongoing series where we step into the lives and homes of our design team as well as our good gypsy friends.  This month DT member, Renee Camacho has welcomed us into her life to see a few beautiful images of her home and the bounty that nature provides in her area of the country.  For those of us in the USA, tomorrow is Thanksgiving.  Renee has also given us some great inspiration for decoration our homes and the Thanksgiving table.  Love it!
Thanks Renee for the beautiful images and inspiration.

And WELCOME to Gypsy Girl Life...


Growing up in Texas, I never truly got to experience Fall the way it’s meant to be experienced.  We moved to Nashville, TN 10 years ago this October.  I’ll never forget that first sight of the beautiful colors and changing leaves.  It was truly amazing.  I fell in love with the area that instant and found something new to love in our relocation. 


Ever since that first Fall I have made it a point to gather decorations and photos to display during this season.  I love capturing photos of the colors and décor around my home and city.  I display a variety of real and fake pumpkins throughout the entire fall season in little vignettes around my home (my favorite way to decorate:  little vignettes that capture color and seasons)  I absolutely ADORE fall and wouldn’t want to live without that color in my life again!

Monday, November 23, 2009

Christmas Project 4

Wish List & Receipt Book
artist Vicki Boutin


Instructions-


1. Cut or punch a circle from the top of 5 kraft colored paper bags.

2. Attach the 5 bags together with stripe Gaffers Tape.


To make the cover:3. Cut 2 pieces of heavy weight cardstock slightly larger than the paper bags (approx 5 x 7"). Cover both sides of each “cover” with patterned paper (The red polka dot and green stripe are the same paper-front and back) and attach to the front and back of the set of paper bags with Gaffers Tape just like we did with the paper bags.
4. “Bind” the book spine with a strip of green stripe patterned paper.
5. Add 97% complete Wish sticker to cover along with label sticker below.
6. Add 2 velvet leaves and 3 brads or beads.


5. Add a Vintage tag to each bag.
6. Punch a 2” circle and stamp with a circle image and add to the left of each tag.
This is the big circle stamp set, 27 circles and 1 arrow. Scale on this product: the small THANK YOU is about the size of a dime and the circle that Vicki used (below the flower on the right) fit on a 2" circle she punched out, see above.
7. Attach a chipboard letter to each stamped circle and spell name with letter stickers.

Friday, November 20, 2009

November Product Challenge

Gift Card Enclosure
artist Ranjini Malhotra

I used one of the new medium sized Naked pockets (3 1/2 x 5 1/2") for my first textured rubbings challenge. I covered the pocket with patterned paper from the Victoria collection (the blue polka dot is on the back of Rosewood paper).
Then I cut up one of these Vintage Tags to create a border.
Can you find which one I used? Remember, don't be afraid to cut or punch into something to get to the images. In other words, a tag doesn't always have to be a tag. You get more use out of the product that way.

I used double sided adhesive to apply a subtle border of a gold textured rubbing sheet to the top and bottom of the tag pocket, and also to the chipboard wings. After applying the texture rubbing on the wings, I stamped over it with cream colored ink. I placed another tag on the inside of the pocket and decorated it with 7 Gypsies stickers and a Victoria brad. I plan to use this as a gift card enclosure for the holiday season and will write my holiday message on the tag inside.


Hostess Gift

For the second project I created a little hostess gift for a friend. I took wooden clothespins and applied textured rubbings (silver and gold glitter) using double sided adhesive and then gussied them up with small bits and bobs (you may recognize some vintage 7 gypsies product!)
I created a small gift box to match using the same technique as the clothes pins. Then applied magnets to the back of the clothespins. Now they're all dressed up for the refrigerator to hold holiday photos, cards or event tickets! I'll give these with a pair of tickets to a holiday event.


Wednesday, November 18, 2009

November Product Challenge

Butterfly Art
artist Vicki Boutin


This challenge was right up my alley! I love anything the sparkles and the Texture Rubbings are a perfect way to add a little glam to a project.

First, I created a quick background by layering two sheets of patterned paper. The second sheet was cut slightly smaller, distressed and attached with paper tape and brads. Next, I covered a sheet of cardstock with an adhesive sheet and ran it through my Silhouette to create the butterfly diecuts.


To add the foil and glitter, remove the backing from the adhesive sheet and gently rub on the first color of foil. (Make sure to place the foil with the shiny side up! The actual foil releases “off” of a backing sheet so if it is placed incorrectly it will remove the glue.) fill in the remaining tacky areas with a second shade of foil or glitter.


Fold the wings of the butterflies and add them to the layout.
Attach word stickers and you are done!


This is such a quick and clean way to
add a little shimmer to your paper projects.
Enjoy!


Materials-
Gypsy Market 12 x 12 paper- Brixton
Savannah 12 x 12 paper- Wright
Paper Tape- Gypsy Market: Patterned
Texture Rubbings: Glitter- Silver
Texture Rubbings: Glitter- Gold
Texture Rubbings: Foil- Silver
Texture Rubbings: Foil- Gold
97% Complete Stickers- Memories
brads
cardstock
Scrapbooks Adhesives by 3L – Adhesive Sheets
Silhouette

Monday, November 16, 2009

Christmas Project 3

Book Cover Wall Hanging
artist Ranjini Malhotra


"I love the Victoria Book Covers and of course, being a gypsy, I had to repurpose it for something other than its intended use. I used Victoria Gaffer Tape, ATC Chipboard Decoratif, the perfect size for this project and a bit of silver glass glitter, a resin cameo, a vintage silk flower and ribbon trim to create a lovely hanging to use as part of my holiday decor."


"I love glitter any time of the year but the holidays are the perfect time to utilize it and I love that this makes a stunning holiday decoration even though it doesn't have the traditional holiday colors of red and green. The French blue paired with coral is a lovely combination." -Ranjini

Friday, November 13, 2009

Christmas Project #2

A Gypsy Tea
Rachel Carlson


Just a few peeks at "a gypsy glee tea" that I will be hosting in my home.
Tea and cookies will be served to my close friends along with handmade gifts.
Who doesn't need a break before the holiday rush?

Invite


Place Setting

Cut outs of the bird cage - victoria 6x6 paper variety pack(Pandora paper)
I tied two pieces of a tree branch with wire and made a hook to hold the bird cage.

Paper cones for tiny cookies


victoria 6x6 paper variety pack victoria brads victoria naked paper tape to close up the cones-(you can see a bit of yellow in the picture above) I will add tiny cookies (family recipe) in cellophane bags and put in cones to go with the tea.

party favor pockets


victoria 6x6 paper variety pack, naked pockets, paper tape
I added a package of mulling spices for tea/wine and a cinnamon stick - yummy!

When the ladies come over next month, I can hardly wait to see everyone's expression when they see the little details of gypsy love!

Thursday, November 12, 2009

Guest Artist

Guest Artist Challenge
Melissa Peck

We feel very lucky to have Melissa Peck joining the gypsies for our textured rubbings challenge this month. We love Melissa's work for it's whimsical nature, use of color and attention to detail. What you might not notice in her work below is the bits of ephemera or messages Melissa incorporates into each piece that adds to the depth and meaning of the painting. You can view more of Melissa's beautiful paintings here.
Scottsdale, AZ

These projects are a feast for the eyes!! So much detail can be found examining each and they all incorporate both traditional paper arts elements and some artist inspired materials including lots of found object, opaque inks purchased from an artists specialty store in Melissa's travels and bold gel pen colors. We love the the foundation for each project was monochromatic color combinations... we never knew our products could look so good grouped by color! Interlaced in the dramatic colors is signature Melissa Peck objects, figures and other oddities that you see in all of her master art pieces.

Color
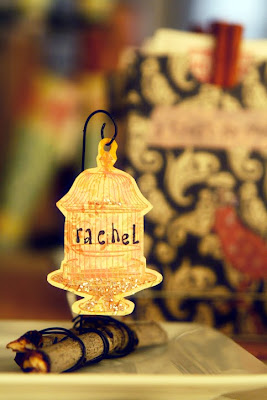
5x7 black board book journal


Cover
-painted black book board with a blue opaque ink
-collaged circles cut from the vintage ephemera pack, old books, personal papers, gum wrappers, etc.
-colored the chipboard alpha numbers and letters with colored pencils
-used brads as embellishments for the center of the circles
-covered an ATC pocket with an image that she liked from a magazine clipping
-applied a textured rubbing to the pocket.

Melissa had a very happy accident when the textured rubbing peeled away from the magazine image leaving a white negative image pattern. She enjoyed the look of the textured rubbing even when she didn't get a complete transfer... gave it character.

-used the vintage and photo metal index tabs... we love the way she showcased the number 2 by having it the only colored tab


paper bird page:
-used a scrap of green cardstock for the background then created a tree from the gypsy market patterned paper tape.
-she created a collage of pieces of the vintage transparencies by cutting the designs out of the 6x6 sheet rather than using the entire piece. She pieced them over the tree and bird using savannah and gypsy market paper tapes. She used a standard hole punch to create polka dots with the paper tape.
-she used her own typewriter to create a background for the body of the bird.

the opposite page showcases her daughter's drawing with glitter glue... artfully framed in shades of green


Old book page for the background and then layered a piece of brown cardstock over the top then created a "tree" with and formed an opening in the trunk by layering ovals loosely cut from a variety of gypsy market papers and further detailed the tree with strips of papers and leaves cut from vellum. She created one of her signature figures coming from the opening in the tree from bits of paper... notice the fabulous black & white stripeed neck created from tas paper. We love the way she adorned the party hat... created from an old letter she received from a friend with red type on it. She embellished with a partial red velvet textured rubbing.


Ochre, golds and a classic black and cream make up the color scheme for the intricate page... LOVE the way this comes together. She used pages from an old disney book, preserving the books' scene from dumbo and using it as a color foundation for the page. She added pages from the book pieced on top of each other then overlayed it with parts of a vintage 6x6 transparency... it is finished off with gold textured rubbings... both glitter and foil some gypsy market striped paper tape and a beautiful paper flower made with gypsy market, victoria and barcelona papers and a victoria brad. Note the ultra cool addition of the ochre colored #2 vintage metal tab.

Beautiful collage


Melissa used victoria Printemps paper for the background and collaged drawings, photos, postcards on the top then altered chipboard alphabet with hot pink gel pens for a dramatic opaque finish and some serious pop! Again, love that she used red textured rubbings on the pink background for an unexpected color combination. The fun flower cut from vellum and found papers showcases her liberal use of staples and hand stitching with multiple colors of pink thread.

4x6 photo carousel tab vignette


LOVE the way she did tone on tone using the red velvet rubbing on the red tab!
She collaged pieces of ephemera and paper scraps together
used the circle M and applied a silver foil rubbing across for some subtle sparkle
used elements from magazines, greeting cards and photos to create a red based collage and ran naked chipboard numbers down the center.

Inspiration
"As you may notice from viewing my paintings I have a passion for color. Often times whether it is a painting or a project I am working on I am often creating monochromatic pieces. More than anything I love the effect of different shades of the same color placed next to each other. Many times I will have 20 different blues or greens in the same painting. So as I was laying out the products thinking about what I wanted to do for this project I instinctively started to group things into color combinations that spoke to me. The arranging of all of them was more secondary. I loved working with the 7 gypsies products and found it important to think out of the box. For example the chipboard letters on the cover were not the colors I needed so I colored them with colored pencils and then also covered the little pocket with a favorite image. I fell in love with the textured rubbings, and constantly found places to use them."

What more can we say?...but,
Thank You Melissa for your inspirational work.