Menu

Monday, September 28, 2009

ATC Photo Display

Did you see the post on Two Peas blog today about the ATC Photo Display? Garden girls Shannon Tidwell, Kelli Crowe, Jen Gallagher and Kelly Purkey each created a fabulous ATC Display for a different occasion...from back to school to Halloween. Click on the link above to see more pictures and read the
comments of each of the Garden Girls who made one!

Notice the little houses on the top row?
by Jen Gallagher


Love this one...because it is so fun to go back and look at past costumes!
by Kelli Crowe

We found another Halloween Display based on the one that Kelli Crowe did...
see it here- Halloween Photo Display

Friday, September 25, 2009

In search of Good Junk


Time for another adventure with the gypsies while we search for good junk!

This time we are in Pasadena, CA at a FABULOUS store called...
Zinnia
1024 Mission St
South Pasadena, CA 91030
(626) 441-2181
http://www.zinnia.biz

(this is the kind of store that you have to look up and down to see everything)
We had no idea what a treat we were in for. What a fabulous place, not only a visual feast and but very inspiring. We first met John who gave us a warm welcome and even shared his work in progress art journal that was fantastic.
We also met Tamara the shop owner, she showed us around and gave us some cards from her personal collection. Tamara and John have been long time 7gypsies fans so it was fun to make that connection and meet them.

This is the view as you first walk into the store....doesn't get much better than this! All those printer trays are filled with all sorts of bits and pieces of funky objects.

the counter and workshop area

Look at the front counter...We would so love this at home! It is made with pieces of tissue paper, paper table runners and Mod Podge, all on a wood base. We would guess it then has a coat of lacquer over the top to protect it. Can you see the "P" from the P is for photos sticker sheet? We also found some vintage 7gypsies paper and tissue in the counter collage.
Do you remember when 7gypsies made tissue paper? If you do, then you have been following us since the beginning! And if you still have some in your stash, then your defiantly a
gypsy at heart...part wanderer and part hoarder!

(remember to click on any photo to see it bigger)

More fun stuff....ribbons, bakery twine, fibers and more!Here's a secret...if you saw the 7gypsies trade show booth and you liked the giant bird cage, this is the store that gave us the idea.
It's just that kind of place, so inspiring and worth the trip.
Thanks Zinnia for letting us stopped by...we loved it and hope to be back soon!!


Wednesday, September 23, 2009

Look who's come by for a visit...

Our gypsy guest artist this month is none other than Tena Sprenger! Tena has been using good 'ole gypsy ingenuity since her days at Memory Lane. She brings her own spin to everything she does and we love it!
We think she has a soft spot in her heart for everything gypsy too!
Thanks Tena...


Paris ATC Tin and Mini Book
Supply list
ACT Tin
Ringed ATC book
New Gypsy Paper Tape
Gypsy Market chipboard letters
Mini Key
Victoria Paper line
Barcelona Paper line
Paris Dangles
Metal paper fasteners
Mini paper clips
Checkered book knob
7 Gypsies Ephemera pack
New seam binding ribbon
NEW Victoria tags
ATC alphabet transparencies
Gypsy market stickers
Naked tag pockets
Disclaimer clear stamps

Adhesive
fine point journaling pen


Instructions
This was a super fun and easy project! To create my decorative ATC tin to hold a mini memory book from my trip to Paris I started by wrapping a 2 inch strip of strip of yellow dotted paper around the tin then wrapping two strips of coordinating paper tape around the tin to create 3 stripes of color around the ATC tin. Use a craft drill to drill a small hole on the center of your ATC lid to attach your knob. I used some dye ink and a "bonjour" stamp I had on hand to stamp into the label area on the metal lid of the tin... I love how it looks! the final step in decorating the tin was to attach my chipboard letters, I used glue dots to secure my Gypsy Market chipboard letters to the front of the tin and tied on a little mini key just for fun!

When putting together my mini ringed ATC book, I pulled out some of the original pages that came with the book and substituted some of the naked tag pockets and ephemera for pages. I wallpapered my blank pages with paper from the Victoria and Barcelona paper collections. I added color to my naked tag pockets with some ink then used stamps from the NEW disclaimer clear stamp set to add multiple phrases onto my tag pockets that coordinated with a travel book. The Victoria bird tags were also a beautiful accent for this lovely little Paris memory book. I added a couple transparencies for a little dimension and my project was complete!
So once again..."Disclaimer" may very well be the best clear stamp ever!
We love how Tena used it to "wallpaper" the naked tag pockets.


Wire Photo and Memory Holder

Supply List
Gypsy Ephemera Pack
NEW 7 Gypsies seam binding ribbon
Mini paper clips
gaffer tape
NEW paper tape
metal fasteners
Black Annealed Wire 26 gage
mini clothes pins
baling wire
1 1/4 inch wooden feet
acrylic paint
Needle nose wire cutters
3/4 " wooden dowel( for wire bending)

Here's how she did it-
I am always looking for new and fun ways to display my photos on and off the scrapbook page! This wire photo sculpture was quick and easy to make and the wire supplies are readily available at most hardware stores. To create the wire structure cut (6) 18 inch pieces of Annealed wire, on 3 of my pieces I created a corkscrew bend before I made the attachment coil and on three of the pieces I just created the attachment coil. The coiling and bending process is made easier my bending and coiling the wire around a wooden dowel, it will create a consistent coil. After bending the coiled( photo grabbing) ends of the wire, bundle them together and at the halfway point on the wire tightly wrap the bundle of wire with the thinner bailing wire creating about a 1 1/2 inch bailing wire segment. Trim off 2 of the 6 legs extending beyond the bailing wire, create legs with the remaining 4. Use a craft drill to drill a small hole in 4 wooden pieces to and insert wires into these wooden feet to stabilize legs.

Decorating your Photo holder.... the super fun part! I used 2 x 3 and 2 x 2 photos along with a 7 Gypsies Ephemera pack to create my photo displays. Mini clips and metal paper fasteners are just the right size to clip your photo to your ephemera card. Gaffer tape and the NEW paper tape provide a fun way to trim photos and ephemera and add color! I used the new paper tape to quickly cover my mini clothes pins and I just love how it transformed them. The great thing about a project like this is that you can change out your photos over time to freshen up your display as you have new pictures, I think this would be fun to use as a seasonal photo display as well.

Thanks so much Tena for 2 fun projects!
Tena Sprenger’s Journey in the Paper Arts and Scrapbooking world began four years ago as an instructor at Memory Lane Photo Arts store in Gilbert, Arizona. She has shared her passion for paper arts, book arts and scrapbooking in classrooms in Arizona, throughout the United States as well as internationally several times a month for the last four years at such events as Creative Escape, Donna Downey’s Inspired Artist Event and Paris Version Scrap. In 2007 Tena added online teaching to her class schedule as teacher for Big Picture Scrapbooking. As an instructor, Tena is known for her unique class concepts and enthusiastic teaching style. Tena‘s classes are technique driven with a focus on unique book arts projects, creative photos, and her flair for incorporating unexpected elements into her projects. Tena is co –author of Lifelines and Artful Memories both published by Northlight Books. Tena has also achieved publishing success as a contributing artist of the following books from Autumn Leaves ; The Book Book, Designing with Fabric, Designing with Stamps, and Designing with Paper. Tena was inducted into the Creating Keepsakes Hall of Fame in 2004. Tena’s artwork has been regularly featured in Creating Keepsakes Magazine as well as Scrapbooks, Etc. and Legacy Magazine. Tena.s television credits include representing Memory Makers Magazine on HSN, the home shopping network and local appearances on Phoenix’s Channel 12 Arizona Midday Program chatting about the latest scrapbooking trends.

Tena lives in Mesa, Arizona with her husband, Mike, and two children, Alyssa and Michael. When she is not busy making a creative mess in her art room, Tena enjoys reading and tap dancing. You can keep up with Tena’s life and art by checking in on her blog: www.tenasprenger.typepad.com.

Friday, September 18, 2009

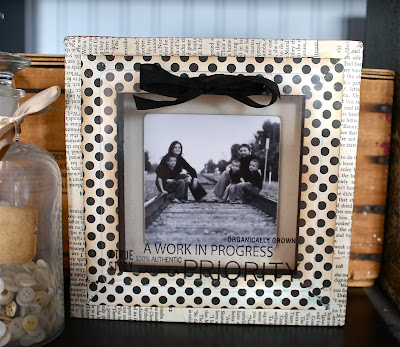
So here we are in day three of our acrylic challenge with another idea...think Christmas present here. So we asked you if you could figure how you could use a stretched canvas and a piece of acrylic to make a fun project...here it is.

Canvas Shadowbox
by Paula Cheney
Here's how she did it:
1. Start with a 8 x 8 stretched canvas. Paula used a canvas that was 1 1/2" thick to give the appearance of a deep shadowbox and one acrylic tabulated book (this book will give you two -6 x6" acrylic pieces with 2 holes on one side).
2. Cut paper strips from an old book or dictionary large enough to cover the side and wrap around the frame of the stretched canvas.
3. Use Mod Podge (matte) to adhere the paper to the canvas. Once the paper is adhered, paint a thin coat of Mod Podge over the paper. Let dry at least 15 minutes.


4. Paint just the inside of the wood frame with black paint. Paula used Claudine Hellmuth's STUDIO acrylic paint in charcoal black for good one coat coverage. It's nice and thick. Make sure you do not drip onto the canvas below the frame.
5. Once the black paint is dry, add a band of 7gypsies Catalonia paper (from the Barcelona line). You can cut the paper into 1" strips and miter the corners as Paula did or cut a 7 x 7" square, then cut out a 6 x 6" square in the center to create the frame in one piece. Which ever way you do it, it really is simple!

Paula used our NEW clear stamp Disclaimer.
This stamp is a must in your stash...it has 66 different stamps on one sheet!
6. Using words from the Disclaimer clear stamp (Paula used: true story, priority, a work in progress, organically grown, 100% authentic and exhibit A) stamp onto the acrylic piece using Staz-on ink.
HINT: when using Staz-on ink on your clear stamps...wipe ink off right after use with a baby wipe and the ink will come off very easy and never stain the stamp.
7. Thread a piece of ribbon through the two holes at the top of the acrylic and tie a bow. Set aside.
8. Cut a picture 4 x 4" and mount on chipboard. Sand the edges, rounding the corners with the sand paper. Add three pieces of foam tape or pop dots to the back and mount directly to center of canvas.
9. Add the acrylic piece to the top with a strip of Therm O Web- Super Tape (one of our favorite products!) hidden behind the ribbon.


10. Run 7gypsies gaffer tape around the outside of the canvas for a little pop of color.

Thanks Paula for a fun idea...now be watching for sales on stretched canvas's so you can get some Christmas presents in the works!
We sure hoped you enjoyed exploring acrylic...but we know you can think of more! So go to the gallery and post YOUR ideas for using acrylic in new ways!

Thursday, September 17, 2009

Are you a TRUE gypsy?

Okay, so for all you TRUE gypsies out there, Janelle has created a fabulous wall hanging. Do you not love it? That girl can throw everything on (including the kitchen sink) and make it look like the most fabulous piece of cool art work ever.
Read on to see how she did it...


Acrylic Wall Hanging
by Janelle Smith
Janelle printed a picture of her daughter on a transparency sheet. She cut the transparency to size and punched holes to match the acrylic hanging book piece which is 6 x 7". Once the transparency was in place she ran an elastic (one of our very favorite products ever!) through the holes and around the back to hold the transparency in place. She added a metal book handle to the top (these just slip on) so the piece will hang as well as secure the transparency.
Now the fun begins! Janelle added lots and lots of dangles (pearl, crystal and silver chain), naked buttons and dangle charms all hanging from the elastic.


At the bottom she added a crystal book knob with a large hanging crystal from our NEW Princesca hardware kit...of course Janelle added some funky rubbings on top. Love it! A couple binding rings in the second hole, with dangle charms (pink flower, silver heart and purse) and vintage buttons added to complete the wall hanging.

We will mention that the acrylic book comes with 3 pieces so can you just imagine what two more added panels to the project would look like. Just add binding rings to connect the pieces together!
Thanks to Janelle for such a great...out of the box...project. We love it!

Come back tomorrow when you can see how acrylic and a stretched canvas can work together to make a fun project. Can you figure it out??

Wednesday, September 16, 2009

Acrylic challenge

The gypsies have been busy working on some ways to use the 7gypsies acrylic books this week. Even though it doesn't take much for us to get creative (usually just the words..."what do you think you can do with this?" works) but sometimes a "challenge" really gets the ideas going! We think we came up with some fun ideas to try and as all things gypsy go...we know this is really just the starting point!

Acrylic Frame
by Debbie Crouse

Debbie sandwiched a photo of her daughter and new grandbaby between two of the acrylic hanging book pages to make a lovely hanging frame.
Before the two pieces were put together she ran a piece of a vintage measuring tape down the left side of the picture and added a strip of our NEW paper tape. Paper tape has a backing that has to be peeled off to expose the adhesive...Debbie used scalloped scissors and cut the paper tape before she removed the backing...a great technique with very little effort, and it doesn't gum up your scissors!
She added a link from a gypsy bracelet (another thing you might have in your stash) with the word "together" from an old dictionary. She ran a couple of pieces of black seam binding to hold everything together and easy as that, she's done!

Come back tomorrow for our next project using acrylic...if you are a TRUE gypsy you're gonna love this one!

Monday, September 14, 2009

Were excited to Announce...

A new addition to our Creative Team...Ranjini Malhotra!
Ranjini has impressed us with her love of all things vintage and her amazing creative talent. Again, we are so happy she is joining us and look forward
to seeing what's up her sleeve next.
We know you will too!


Ranjini is a self-described dreamer, storyteller, and artist. You'll find her holed up in a local bookstore pouring over magazines and book jacket designs, reading a novel or children's literature, or looking for vintage or rare antique books and maps, all the while savoring a cup of hot tea. She loves the eclectic, the unique, and anything Old World. You can find her combing antique stores and flea markets for vintage treasures that she can combine with new products to create something unexpected. She loves the paper arts, but also has dabbled in watercolor painting, needle arts and photography. She believes that the world is unlimited source of inspiration and creativity, and that the journey and what you learn about yourself along the way, is always more important than the destination.Ranjini lives in Columbus, OH with her husband Bobby and her little girl Alekha and one very lovable cream colored goldendoodle.

Friday, September 4, 2009

September Product Challenge details


Last month we announced that beginning in September we would issue a product challenge to YOU, our fellow gypsies. This is a creative challenge of sorts~ a way to try something new and use a product that you may have never considered before and it's all because we LOVE to see what you can do!

September's official product is the... (drum roll please)


The clear acrylic hanging book is made of 3 6x7" clear acrylic panels. What's fun about this book is that you can bind it like a book or hang it from your wall. The rings are even included.

If you've ever worked with acrylic you know just how fun it can be~ and if you haven't it's time you tried! We like it because it presents a whole new way of looking at things. Rather than working with the surface of a paper page or piece of bookboard, your artwork can take on a whole new dimension by using acrylic in creative ways.

Some of our favorite ways to alter acrylic include using transparency overlays, rub ons, stamping images with Stazon ink, applying photo transfers, painting the surface & more. We also think these products are fun additions to your acrylic art. Check them out by clicking on them!


We have sent a few of these Clear Acrylic Hanging Books to some of our Gypsy Artists as well as our September Guest Designer (we'll announce who she is next week!) to see what they can do with them. We will be posting the results soon.

So join in the fun and enter to win some 7gypsies goodies! Simply post a project using our hanging book in our photo gallery to enter. We'll announce the winner at the beginning of October. If you don't happen to have one of these unique books "hanging" around, you can purchase on by clicking HERE!

Remember: try something new, push the limits and dare to be different.

We can't wait to see what you create!!

Wednesday, September 2, 2009

Creative Escape-Chapter 5

GOOD TIMES
We had such a great time at Creative Escape! We loved making new friends and catching up with some old friends (lovingly known as our stalkers) - Karey, Megan and Laura.
Our Aussie friends - Sally, Sandra and Lorraine (the queen)Thanks to the Jones' (Mr. and Mrs. Bazzill) and Heidi for inviting us we had a wonderful time!

Creative Escape-Chapter 4

All the teachers were asked to design a button for Creative Escape. Ours said, "She knew with the right amount of junk she could create a masterpiece". This is straight out of Paula's genius head. Also pictured is Tim's button - "Live the live you've imaged" and Heidi's - "Once in a lifetime".


Love the attention to detail from Creative Escape organizers.....notice in the bottom corner of the frame is our room key.


There was a lovely group of women at the event that met on Yahoo early in the year. This group of about 75 women decided to have a charm swap. Each made 75 charms of their of their own design then sent the charms to the organizers who then created these fabulous necklaces with all the charms. We were lucky enough to each receive one of these artful creations......pretty cool huh?!


Creative Escape-Chapter 3

The Great Lamp Auction and Raffle
3 months before Creative Escape all the current and past CE teachers were sent a very plain (and we really mean plain) Ikea lamp to decorate in our our style to raise money for the leukemia and lymphoma society. The only stipulation was that it had to fit back in the same box it came to us in. There were so many different styles of fabulous lamps to choose from! The attendees could purchase raffle tickets and then drop their tickets into the box of the particular lap they wanted to win.


Debbie's lamp


Paula's lamp

Then came the final dinner where Tim and Heidi's lamp's were auctioned. If you have ever been to a live auction you might understand the auction fever that can happen. It was great fun seeing the people getting so excited about the lamps and raising money for the leukemia and lymphoma society.
Would you believe that Heidi's lamp sold for $8,000 and Tim's lamp sold for $29,000?
Big money but for a great cause.
What a night...no one could stop talking about it.


Creative Escape-Chapter 2

The Project-Hidden Treasures
Here is the project that our students made. It was created using 1 package of 7gypsies 8 x 8 book board. The final size when complete is 10 x 10. You can see in the next few pictures that the piece has two hiding places for extra pictures or journaling.
The students were asked to bring their own black and white photos so each project had a different feel to it. One of the best things for us was being able to walk around and see the students fabulous pictures. We saw babies and weddings, heritage photos and favorite pets. It really spoke to the flexibility of the project. It was also a great way to meet your neighbor that might be from another state or country. No matter where your from or what your situation we can all identify with each other through photographs.


The Great Escape-Chapter 1

Hey gypsies...we just wanted to tell you about our experience teaching at Creative Escape in AZ this past weekend. We had the time of our lives teaching, catching up with old friends and making some new gypsy converts. We loved it when our students would have the aha moment in class...it was as if you could see the lightbulb go on above their head. So great.
So here's some pictures and stories of the weekend...enjoy, Deb and Paula

Our venue-Wild Horse Pass Resort


Trunk Show
On the first day there was a trunk show where all the artists that were teaching at CE created a display table of their work. Here is our display...wish you could see it all up close! It was great fun to go back through our past projects and pick some of the best from years past to display. If you would like to see the rest of the teachers displays you can find them on Tim's blog here.