Menu

Showing posts with label Debbie Crouse. Show all posts

Tuesday, October 25, 2011

artist advent blog kit: section #8 by debbie crouse

Section #8 - Debbie Crouse

What great fun to be able to do a project with the entire 7g design team.  We have the best design team and it is great working with these talented ladies. 

We were all assigned to do one of the twelve sections in an ATC receipt holder.  
This is mine, section #8 - 
Materials: (all 7gypsies)
Paris tissue paper
ATC Tag Kit: Affirmations (#8, tag with stamp image)
(1) princesca dangle
(1) mini key
(1) apothecary bottle - thinner bottle
Metal Charms Fortune (remove the wing and set aside for section #9)
Other:
chipboard (or 7G packaging)
tiny frame (2.5"x3.5")
page from old book
fabric (3"x5" - any color, will not show in project)
adhesive
mini tag (1/2"x1" - can create from scrap paper)

seam binding ribbon (or string)
antique brass chain (or string or ribbon)


Project tips:
- you can substitute the 7gypsies packaging in the kit for any of the chipboard/book board needed. be very careful when opening the packaging if you would like to use it.
- keep ALL your paper scraps from each section, you will need them for section #11
- you can use scissors in place of all punches
- you can use the purple ribbon in the ATC Photo Display kit in place of any string and wire


Instructions:
To me the challenging part about this project was, what do do in the tiny space of 2.5"x3.5".   I decided that it would be cute to use a small frame that would act as a shadowbox.  Here's what I did:
1.  Find a small gold frame at an antique or thrift store approximately 2.5" x 3.5" in size.  (This is one of those little gold frames that your grandma displayed your school pictures in.)


2.  Cut a piece of heavy chipboard the size of your frame using your frame as a template.
3.  Cover the chipboard piece with a page from an old book.  Ink edges.
4.  Cut a piece of fabric slightly larger than your frame.  Add 1/2" in height (this is to turn under in step #5).
5.  Turn under fabric 1/2" on one end and glue with glue stick.
6.  On the back side of chipboard, run a bead of glue around the edge on 3 sides as shown. 
7.  Attach fabric to chipboard piece with folded edge on bottom.  Do not glue folded bottom edge (this is where the wire arm on the receipt holder will be inserted).  Trim any excess on edges.
8.  Drill tiny holes in top of frame.  This is where you will wire the chain and dangles to frame.
9.  *Please note:  This photo is showing the back side of frame.  On fabric side of the chipboard piece, run bead of glue around 3 edges (Do not glue the folded fabric edge).  Slip into frame and press so it attaches to back of frame.  The open edge of the fabric is where you will slip the clip under neath fabric to attach to ATC receipt holder.  
10.  The label for bottle is cut from 7g "Paris" collage tissue.  Gently glue to bottle and tie tiny tag to bottle neck.  Screw mini eye hook into bottle cork.
11.  Add "fly" word to wings charm and attach to crystal drop. 


12.  Attach bottle and wings charm to ends of chain and wire to frame as shown.  Tie narrow ribbon on both dangles.


13.  Postage stamp is cut from 7g tag and glued to background.


14.  Cut a circle piece from bookboard to fit "8" piece and attach to frame.
That's it....really pretty simple!


a little about me...
I have been with 7gypsies since Donna and Steve Smylie started the company and feel lucky that I have been able to be a part of their journey.  I am over the fabulously talented 7gypsies design team and also planning and decorating the 7gypsies booth at CHA shows.  You can find out more about me on my blog - "One Lucky Day" that I share with Paula Cheney (also on 7g design team) at www.2gypsygirls.com.  Paula and I have had the opportunity to travel around the world teaching classes that show off our favorite 7gypsies products.  The best part of that is that we have been able to meet lots of fun and interesting people along the way.  


blog that inspires me...  I am loving Janet Hopkins blog.  We have known each other for years and I hadn't been to her blog in awhile and recently checked it out because we found out we had done similar posts on each of our blogs on almost the same day.  She is fabulous and always has great inspiration! 


Join Ranjini Malhotra Thursday for section #9. Other items you will need are:
Seam binding ribbon (8") or string
Glitter
White acrylic paint

Wednesday, February 17, 2010

Venice Card Set
by Debbie Crouse


I love the Venice clear stamp set.  I made a set of thank you cards using the stamp set along with paper, paper tape, bakers twine and ribbon, an old dictionary and 7g kraft envelopes.  
Cut cards to fit the 7g kraft envelopes.   Stamp card and add bits of paper and paper tape.  Include ribbon or twine in stitching on card and don’t forget the envelope flap.  Simple, easy and I love having some thank you cards ready and waiting when the occasion arises.

Card No. 1
sew over string
tie a bow

Card No. 2


Card No. 3

Tuesday, January 12, 2010

Behind the Scenes


By Debbie Crouse
7gypsies - wearer of many hats

Don’t you love the portfolios?  We do too and thought you would be interested in how this product came to be.  I was having a girls retreat at my house.  As a thank you gift one of my friends brought me this fabulous portfolio with snippets of goodness, glassine envelopes filled with treasures and some really fun and unusual ephemera.  All were tucked, clipped and tied to this very cute portfolio.  We all loved this cute little folder, it was different and had so many possibilities.  We found out she had gotten it at an office supply store of all places.  Of course we all wanted one (or a dozen) so while they were there that became our mission, along with our other fun shopping.  We scoured the valley looking for them.  In our search we discovered that they were no longer available and of course we bought all we could find in our area.  I sent one to Donna, the gypsy who started it all, she also loved it and so it was the inspiration for a new 7gypsies product.
Here are a couple of projects we made with them:

The original portfolio I received as a gift.
The original inside....As you can see on the above photo this was made in 2005. I took these pictures today, everything still intact from the day I received it. It's too dang cute to use!
This one I made for Home Companion magazine.  (My favorite magazine of all time....don’t get me started, I’ll tear up.) It was an invitation/journal for another girls retreat. 


This project shows the large size portfolio.  The other projects we have shown use the medium size that comes in red, black, and naked.  The small size (4.5 x 6") is fun for photos or cards.  We would love to see what ideas you come up with!  Post to the gallery or email us images of your project....we love good inspiration!

Monday, December 14, 2009

December Product Challenge

December Product Challenge
You may have heard that Kerry lynn, owner of Kenner Road is our guest designer this month. Okay, okay we started the rumor, but we were as excited to see her work as you are!  Her style is reflected in the kits she gathers together for Kenner Road so we knew her work would be right up our alley...a mix of old and new, junky with a bit of clever added in...and you know how us gypsies love clever.    And the very best thing?  She did multiple projects so stay tuned, there’s more from Kerry lynn all week long. Fab-U-lous!
 

So, back to our monthly Product Challenge...Three different artists, totally different ideas on what to do with the Monogram stamp set.  We hope you love these as much as we do. 
Enjoy!

Gift Wrap
Debbie Crouse
Used monogram stamp for gift wrap trim.

1.  Stamped monogram stamp on creme cardstock and cut out with a 1/8" edge from the dot circle.
2.  Used vintage photo distress ink on edge toward center.
3.  Glitter edge or leave plain.
4.  Using the monogram circle as guide pink edge of book paper 1/4" larger than monogram circle.
5.  Punch 1/8" holes on sides or top and bottom for ribbon to run through.
6. Run ribbon through holes and tie ribbon into bow.
Idea #1-traditional
 
Idea #2: silver glitter edge 

Notice that Debbie glittered a jingle bell and added her signature tiny tag for an extra detail.  She is so good at the little details that take a project from great to fabulous. Love this idea.


Wouldn't you like this under your tree?

Christmas Gift Enclosures
artist Ranjini Malhorta
I bought gold and silver envelopes at Walmart and sealed the back flap, then cut off the tops and punched out a half moon shape with a circle punch. I then added a vintage photo image (from ones I posted recently on my blog).
I simply printed the image off on photo paper, applied some PVA glue (a very thin layer) with a cotton swab, then sprinkled glitter on the entire bodice of the angel and in random areas of the bodice of the woman in blue. I love the subtle elegance glitter adds to the photos. I then added some ribbon and a monogram punched out and used as a tag. These would be great to use as place settings or to fill with treats and a card for a friend at a Christmas tea. 
 

Joyeux Noel Garland 
I also made a garland punched from the stamped monograms.  I used 7gypsies Metal Page fasteners (just pinch to close) to attach the monograms to a long length of gray grosgrain ribbon. Using the fasteners enables you to hang it both vertically and horizontally. It is simple but elegant. 

Joy Wall hanging
guest designer 
Kerry Lynn
Kerry Lynn used 7gypsies book cover (Autograph) to create this great little wall hanging.  The book cover makes a great vintage background to spread a little Christmas joy.  She punched two holes at the top for eyelets, then used a crystal chain from the Princesca Hardware kit and a piece of vintage chain to create a hanger. Then she wrapped a key from the Vintage metal kit with linen and wire and adhered to the book cover. 
Another piece of the linen is wrapped around the end of the chain and stapled.  Kerry Lynn stamped the O for the word Joy with the Monogram stamp, then punched it out with a flower punch.  She stapled vintage letters to the monogram flower to create the word JOY.  The rosette is created by fan folding a piece of red Zanzibar paper and then gluing the ends together to create a circle. 

The pieces are layered inside a vintage Christmas tree light reflector to create the rosette centerpiece.  Simple, clever, easy...what a great look. 

And remember...there's more to come from Kerry Lynn in the coming week! You won't want to miss it.
Kerry Lynn Yeary lives in beautiful sonoma county, california with her husband and two children "the littles". She adores creating anything that incorporates print & pattern with vintage textiles & ephemera. She loves sea salt caramels, the color pink, bonnie cashin, cutting paper, big beach bonfires and anything old, tattered and worn. She also owns a beautiful little vintage inspired kit club "Kenner Road" {http://www.KennerRoad.com}, named after the street she grew up on in the middle of nowhere in the heart of the central valley. You can learn more about her life & her passions and see more of her work on her blog, live.craft.learn

Wednesday, December 9, 2009

Christmas Project #7

Maybe we should have said "projects" since we have two for you today!  First is a fun idea using the Photo Display stand from Rachel and a sneak peak of a project from Debbie.  

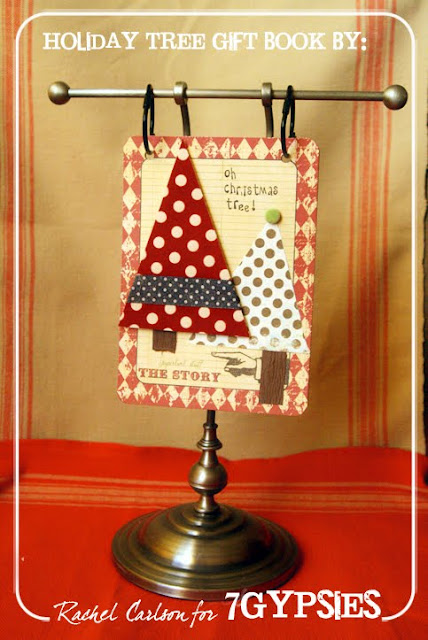
Holiday Tree Gift Book
by Rachel Carlson

A simple project for a quick gift to document an upcoming holiday tradition.  My sweet friend purchased our tree tag to cut down our own tree this weekend – Dec. 5th.  Her family will also cut theirs down on the same day.  I made this book for her to document her family adventure.  Now I have to make one for us!

OH MY GOODNESS! If you haven’t purchased the Photo Display Stand, you better.  It is THE best way to display a holiday project for all to see ‘in the now’ and very easy to switch out projects along the way.  I can’t wait to see what project will go in here next!

Products used:
Gypsy Journal Pages
Green Velvet Brad from Nottinghill collection
Binderie Punchit went through all SIX pages of the journal pages
Barcelona Paper
Savannah Flock Paper – great for the holidays!
Paper Tape – Polka Dot (Victoria collection)
D-Rings – medium - black

A little BONUS PROJECT for all you gypsy girls that collect bits and baubles...you know who you are!  Debbie Crouse posted this project on her blog...we just had to give you a glimpse.  Fabulous...what a clever idea! You can see the rest of the project, including why and how she made it HERE.  Be sure to scroll to the last picture to see what it does...yes, it really does something!  Clever, clever girl...that Debbie.


Wednesday, September 16, 2009

Acrylic challenge

The gypsies have been busy working on some ways to use the 7gypsies acrylic books this week. Even though it doesn't take much for us to get creative (usually just the words..."what do you think you can do with this?" works) but sometimes a "challenge" really gets the ideas going! We think we came up with some fun ideas to try and as all things gypsy go...we know this is really just the starting point!

Acrylic Frame
by Debbie Crouse

Debbie sandwiched a photo of her daughter and new grandbaby between two of the acrylic hanging book pages to make a lovely hanging frame.
Before the two pieces were put together she ran a piece of a vintage measuring tape down the left side of the picture and added a strip of our NEW paper tape. Paper tape has a backing that has to be peeled off to expose the adhesive...Debbie used scalloped scissors and cut the paper tape before she removed the backing...a great technique with very little effort, and it doesn't gum up your scissors!
She added a link from a gypsy bracelet (another thing you might have in your stash) with the word "together" from an old dictionary. She ran a couple of pieces of black seam binding to hold everything together and easy as that, she's done!

Come back tomorrow for our next project using acrylic...if you are a TRUE gypsy you're gonna love this one!

Tuesday, February 10, 2009

G is for Grateful... for our Arizona Gypsies that is!

Two of our favorite gypsies, Paula Cheney & Debbie Crouse packed their trunks and hit the road for Payson, Arizona.  

They set up camp at a darling little shop by the name of Paper & Metal Scrappers and taught a fabulous gypsy inspired class using our stacked accordian book!  Here's a peak at the cover...

Debbie & Paula came back from their latest journey excited to have met some of our sun lovin' Arizona gypsies.  In fact, there were so many gypsies awaiting their arrival that their class was taught at a neighboring coffee shop because the store couldn't hold all of the gypsy girls lined up to be inspired!
   The entire month of January was declared Gypsy Days in the store!  7gypsies classes were offered throughout the month in addition to promotions and other fun goodies for fellow gypsies to indulge in.


We were so impressed with their gypsy flea market style displays.  All sorts of 7gypsies trinkets and goodies were spilling from vintage suitcases, baskets and antique inspired metal tins all nestled among bright bright scarves and bits of fabulous fabrics.  What true gypsy could resist?  Way to go girls!

Here are two of our favorite gypsies- Brenda & Barb, owners of Paper & Metal Scrappers!  Hello fellow gypsies and thanks for letting us set up camp at your shop! 

By the way... Did you know that we have an entire band of gypsy instructors that travel and teach at scrapbooking stores?  If you are interested in hosting a gypsy at your store email us for details!