Menu

Showing posts with label Vicki Boutin. Show all posts

Tuesday, May 1, 2012

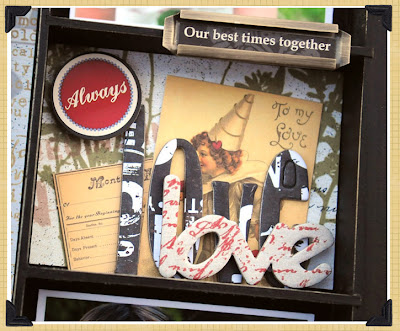
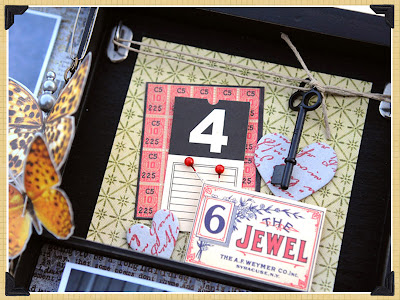
you can so do this: vicki boutin shadowbox


12x12 shadowbox
by vicki boutin
Layer background papers and add stitching along the bottom.  
Add papers to the 12 x 12 frame

Layer tickets and a book frame inside the shadow box

Add tape to the upper right and lower left corners of the matted paper.

Attach a piece of a ticket and a key wrapped in twine to the upper right corner.
To create the layered heart, spray a number of paper towels with Glimmer Mist, dry and cut into heart shapes.  Also cut various sizes of hearts from the printed Collage Tissue and layer together.  Sew the layers together and add beads

Add the heart to the book cover.  Attach a ruler.

Add crème buttons to the right of the book cover.

To create the cherry blossoms, mist Collage Tissue with red Glimmer Mist and dry.  

Cut the Collage Tissue and pink tissue into blossoms and layer together.
Salvage a tree branch and adhere to the frame.  Glue the blossoms to the branch.
Add corners, scrabble letters and holder

thanks Vicki!!!

Tuesday, April 24, 2012

look what we got: shadowboxes!

we LOVE shadowboxes
we've always had a passion for shadowboxes. 
in the past we've seen gypsies everywhere creating these from scratch with sections made from cardboard or wood - now we have these beautiful wood shadowboxes that are perfect for home decor!

both the 12x12 and 8x8 shadowboxes and the inserts are in stock and shipping now!! 
the 12x12 shadowbox is perfect for adding depth and dimension to a 12x12 layout. 
we love all the layers Vicki Boutin has added to her shadowbox 
our 8x8 shadowbox in a natural wood color is perfect in so many ways. 
you can leave it as is, use our 8x8 papers as a backdrop to build from or paint and distress!

if you've never worked on a shadowbox, but would love to give it a shot, adding one of our inserts is the perfect first step to giving yourself some creative imagination.
Paula Cheney did such a fantastic job displaying her favorite parts of the Trousseau line papers or some words or even a picture. the bottles, beads and block add the dimension desired for her shadowbox creation!


Saturday, February 11, 2012

from our workshop: cha winter sneak peek #5

New SHADOWBOXES!

Many of you have already fallen in love with our vintage inspired wood display trays.  Well, we have too and just had to give you a couple of new ones to create with!

These basic shadowboxes are done right~ with an added distressing and just the right thickness and depth.  They become gorgeous showpieces for your precious belongings and latest creations.


We offer a 12x12 version in black.


and the 8x8 version in a natural wood.

The 8x8 shadowbox also has accompanying inserts in both round and square.  Simply slip the inserts into the shadowbox and fill with your latest findings.  Or perhaps create a project using the insert like one of our talented gypsy artists shown below!


We'd LOVE to send 2 lucky gypsies a shadowbox of their own.  
Simply comment on your FAVORITE new product from the CHA release and you'll be entered to win.
good luck gypsies!

Friday, January 27, 2012

from our workshop: cha winter sneak peek #1

We are packed up and headed to CHA and excited to share the new release with gypsies at the show!  
Be sure to check our facebook for pictures and updates from the show floor.

While we're traveling we've got the blog setup to share our new release with all of you that won't be attending the show.  Enjoy!


Our newest collection is called Postale.  
It is a 12 paper collection, yes 12 fantastic postale papers to choose from!! 

Here's a quick look at some of our collection inspiration boards.

We drew inspiration for this new collection from all things postal~ stripes, colors and more.  We not only loved that it allowed us to bring in elements of this new trend, but that the collection speaks to the written letter and its journey from sender to a far off destination.


We also LOVE the strong clean look of typography and the design elements associated with letterpress and felt that this would also work well with the postal theme.


Vintage signs, arrows, the swiss cross and the textures of worn paint and metal were also part of our inspiration for the paper designs.

You'll see that what transpired in our designs was 6 postale papers with fabulous, rich color layered under crisp whites for an authentic vintage look.  But because we know every gypsy loves the antiqued look we also created 6 designs with an antiqued finish and call those Antiquaries Postale....

POSTALE


ANTIQUARIES POSTALE


The paper collection is also available in 6x6 and 8x8 paper packs.  You'll get 4 of each design in these scaled down versions of the 12x12 papers.  Perfect for ATC, Cardmaking and mini albums!

POST a comment and let us know what you think of the new paper line!!  You never know when we just MIGHT giveaway a set to our most enthusiastic gypsy.

Check back Sunday for a look at all the fun Postale collection products that coordinate with our papers and hear more about the inspiration behind the design!


Saturday, December 10, 2011

gypsy life: holiday decor - candles, envelopes

have you seen the Pottery Barn candles? well we absolutely love them and as we've discovered, so does our gypsy Vicki! 
 she created such a wonderful decor item using the 7gypsies life tissue paper and some cream colored candles! so simple...and probably 1/4 the price of the Pottery Barn ones!
 we adore the way she dipped the bottom of the candles in epsom salt - it looks like snow!
 such a cute ensemble wrapped up in a gorgeous ribbon, some fake holly, gypsy hardware and the JOY tag!
 how perfect is this for a table centerpiece, sitting on a side table in a hallway or entryway or in a bathroom?! swooooon....
 paula created this perfect little envelope to hold gift cards! 
and this even larger envelope to hold a christmas card!
click HERE to see her tutorial on how she made these fabulous envelopes!

Thursday, December 8, 2011

gypsy life: holiday decor - tags!

after you spend so much of your time thinking and contemplating the perfect gift for all those special people in your lives and then finally wrapping those presents, you think, "how will people know who it's for?"
why not create a fabulous tag like our gypsies Mou and Paula did?
 mou always does such a great job mixing in all sorts of fun elements into her projects, and this time is no different....
starting with our gorgeous gypsy tags, mou began adding pieces, layer by layer, to create these beautiful-one-of-a-kind gift tags!
look how she used a frame from our frames collage tissue and the Christmas stamp to add fun holiday statements!
 paula created these vintage tags using our frames and silhouettes collage tissue!
adding some pieces from old song books behind to create such beautiful dimension..
want to know how she cut the images out so precisely? check out her blog for a how to!
we will be sharing holiday decor ideas all week gypsies!! 
don't miss out on all the fun we are having here in the gypsy workshop

Tuesday, November 15, 2011

projects and inspiration: christmas gift ideas part 2!

we all know that holiday's can be a very stressful time.....
why not help someone relax a little? 
grab some lotion, bath salts, whatever you prefer - find a fancy book knob to place on the front - place items in drawer and you've got yourself a pretty-adorable-can't live without-bath and beauty kit!
ranjini did a fabulous job displaying the kit in spectacular mini library drawer!
we love hot cocoa here in the gypsy workshop! 
and what a perfect little gift for someone in your life that loves it as much as we do...
ranjini added those little extra touches that make this simple gift so fantasticly delicious!
 vicki created this beautiful gift with our photo shadowbox tray!
 the little details she added gave this a personal touch that you just can't forget...
 just grab the 7gypsies photo shadowbox tray, some photos sized to fit the compartments and all the embellishments you can find....
and just start placing them in the tray to see what you can come up with!
don't forget to like our Facebook page!

Monday, October 10, 2011

artist advent blog kit: section #1 by vicki boutin

Section #1 - Vicki Boutin


I was so excited when the gypsies sent me the info for this little ATC project! There are a bunch of talented ladies on this design team and I can't wait to see how they created all of there lovely projects!
Materials: (all 7gypsies)
Tag Kit: Affirmations (Happily Ever After, #1)
Lille 6x6 paper pack (Elen and Crazy Love)
Lille Clear Stamps
Paddington Chipboard Alphabet
Collage Tissue: Paris
(2") Gaffer Tape:Venice
(1) Binding Ring Dangle: Crystal
(2) Mini Label Stickers: Naked Black
(1) Miniture Key: Antique Brass
ATC Photo Display Kit Tag
Other:
1 3/4" circle punch (you can also use scissors)
Foam Adhesive squares
silver glitter
red spray ink (you can also use distress stain or red marker)
black stamping ink
brown stamping ink (for the edges - can also use distress stain)
fine point black pen or sharpie
(1) brad
(3) rhinestones
sewing machine


Project tips:
- you can substitute the 7gypsies packaging in the kit for any of the chipboard/book board needed. be very careful when opening the packaging if you would like to use it.
- keep ALL your paper scraps from each section, you will need them for section #11
- you can use scissors in place of all punches
- you can use the purple ribbon in the ATC Photo Display kit in place of any string and wire


Instructions:
BEFORE YOU START: you will want to find the section #11 clip area and flip the receipt holder over. using pliers or other tool, bend the clips so that they come loose and the clip comes out completely. you will not need the clip for section #11.


1. Coat the letter or number of your choice in adhesive and add glitter to the chipboard letter. Set aside to dry.
2. Place a small amount of adhesive on the very outer edge of the "1" circle tag and add glitter. Punch a hole in the bottom of the tag. Attach a crystal dangle to a mini key and add the crystal dangle and a miniature key to the "1" circle.
3. Trim a 2 1/4" x 3" piece of the back side of "crazy love" paper and ink the edges. Stamp the line border in black along the left side of the paper. Trim the Eiffel Tower from the Elen paper and ink the edges. Ink the edges of the Happily Ever After tag.
4. Glue the pieces on top of each other to create the ATC. Stamp two star images in black along the bottom. Add stitches with red thread to the bottom and the left edges.
5. Add a 2" piece of Gaffer Tape and stitch again. Attach three rhinestones to the top part of the Eiffel Tower, place chipboard letter in upper left corner, write "create" and "art" on two label stickers and stick in bottom right corner, covering part of the stars and tie black ribbon (or red ribbon) to tag. 
6. (in step 8 you will mist spray the tissue, you can also color with a marker, however if you are coloring the tissue, do this now) Punch or cut five 1 3/4" circles from the Paris tissue paper and add a brad to the center of the layered circles. Crumple the tissue starting with the top layer.
7. Crumple all layers until flower takes shape.
8. Mist the tissue flower with spray ink.
9. Using adhesive (glue dot) stick the "1" tag in the center of the flower. Add assembled flower to the clip tag.


a little bit about me: I love to paper craft and play with techniques! I often say I could be that person who forgoes sleep in order to get lost creating. Hey! I already am that person! I travel around like a true gypsy teaching workshops and I just finished writing my first book Creative Foundations this past summer! It is now available for pre-order on Amazon.com, Barnes and Nobles and Chapters.ca. (did you happen to notice that 7 Gypsies Printer's Tray on the cover??) It will be in stores in December 2011. Here is my blog if you feel like hopping over for a visit...http://vickiboutin.typepad.com/.


A blog that I am digging right now...I love blogs and internet info in general. I love a cup of tea and hours of surfing the web for inspiration. Here is one I stumbled across this week...Ruffledblog.com. I love wedding blogs. Not planning another one any time soon, but they are full of photography ideas, fun DIY and all around great ideas!!!

Thanks for stopping by!!!


Join Sierra on Thursday for section #2! Other items needed are:
Adhesive
(1) Glue dot